How to create a Network Layer for your iOS App
Elevate your iOS app’s connectivity! Master Combine, closures, and async/await for a robust network layer.
In most cases, the Networking Layer is the most crucial part of an iOS application.
I would like to propose ideas for a reusable Network layer that can be integrated into our application.
We will cover the Networking Layer in three different sections
- Create a Network Layer
- Create a Swift Package Manager and publish it on GitHub
- Building Modular iOS Apps: A Guide to SPM, MVVM, SwiftUI, and Combine/Async-Await Before discussing the network layer, it's important to understand the role of generics in networking.
Generics
Generics in Swift allow flexible and reusable code that can work in different types while maintaining type safety.
Key Points
- Type Safety
- Reusability
- Parameterization
- Collections — Arrays or Dictionaries
- Associated types
- Simple example — Swapping values of two Strings.
Without Generics:
    func swapTwoString(_ a: inout String, _ b: inout String) {
        (a,b) = (b,a) // without using Third variable
    }
    var str3 = "Saba"
    var str4 = "tr"
    swapTwoString(&str3, &str4)
With Generics:
    func swapTwoValue<T>(_ a: inout T, _ b: inout T) {
        (a,b) = (b,a)
    }
    var d1 = 2.52413132
    var d2 = 7.77837812
    swapTwoValue(&d1, &d2)
The above example works with String, Integer and so on. If you would like to restrict generic to numeric, then use <T: Numeric>
Package structure
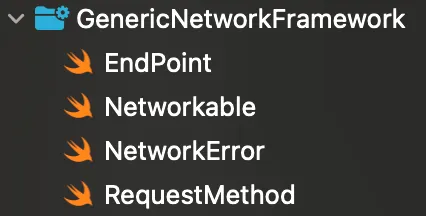
- Endpoint: Protocol to set up all endpoints such as host, scheme, etc.
- Networkable: Most important one in this article. The protocol contains methods that execute the generic requests (different variants).
- NetworkError: Manage errors in an enum conforms to Error protocol. Add specific cases from API or app.
    public protocol Error : Sendable {

    }
RequestMethod: Define the main HTTP methods to perform requests. Additional methods can be included.
To follow the Dependency Inversion Principle and satisfy the SOLID principle, we must rely on protocols rather than concrete types of classes, structures, or enums.
Create a Networkable Protocol — Async/Await, Combine and @escaping closure.
protocol Networkable {
    func sendRequest<T: Decodable>(endpoint: EndPoint) async throws -> T
    func sendRequest<T: Decodable>(endpoint: EndPoint, resultHandler: @escaping (Result<T, NetworkError>) -> Void)
    func sendRequest<T: Decodable>(endpoint: EndPoint, type: T.Type) -> AnyPublisher<T, NetworkError>
}
Practice in the playground for a complete understanding of URLComponents and URLRequest.
    public protocol EndPoint {
        var host: String { get }
        var scheme: String { get }
        var path: String { get }
        var method: RequestMethod { get }
        var header: [String: String]? { get }
        var body: [String: String]? { get }
        var queryParams: [String: String]? { get } // Added for query parameters
        var pathParams: [String: String]? { get }  // Added for path parameters
    }

    extension EndPoint {
        var scheme: String {
            return "https"
        }
        var host: String {
            return ""
        }
    }


    extension Networkable {
        fileprivate func createRequest(endPoint: EndPoint) -> URLRequest? {
            var urlComponents = URLComponents()
            urlComponents.scheme = endPoint.scheme
            urlComponents.host = endPoint.host
            urlComponents.path = endPoint.path
            guard let url = urlComponents.url else {
                return nil
            }
            let encoder = JSONEncoder()
            var request = URLRequest(url: url)
            request.httpMethod = endPoint.method.rawValue
            request.allHTTPHeaderFields = endPoint.header
            if let body = endPoint.body {
                request.httpBody = try? encoder.encode(body)
            }
            return request
        }
    }
- In the above code, we will able to create URL and URL requests with components of EndPoint.
- In case, we are sending a POST request, we can extend the EndPoint protocol and add values to body parameters. Encoder will be beneficial to proceed with sending requests with body value.
Typical Approach
Swift introduced this approach in Swift 5 — Closure with Result and is commonly used for Networking.
Result A value that represents either a success or a failure, including an associated value in each case.
    @frozen
    enum Result<Success, Failure> where Failure : Error
It has both cases
    case success(Success)
    case failure(Failure)
This is the Generic Networking API using @escaping closure suitable for all HTTP Request Methods such as GET, POST, and others.
    func sendRequest<T: Decodable>(endpoint: EndPoint, resultHandler: @escaping (Result<T, NetworkError>) -> Void) {

            guard let urlRequest = createRequest(endPoint: endpoint) else {
                return
            }
            let urlTask = URLSession.shared.dataTask(with: urlRequest) { data, response, error in
                guard error == nil else {
                    resultHandler(.failure(.invalidURL))
                    return
                }
                guard let response = response as? HTTPURLResponse, 200...299 ~= response.statusCode else {
                    resultHandler(.failure(.unexpectedStatusCode))
                    return
                }
                guard let data = data else {
                    resultHandler(.failure(.unknown))
                    return
                }
                guard let decodedResponse = try? JSONDecoder().decode(T.self, from: data) else {
                    resultHandler(.failure(.decode))
                    return
                }
                resultHandler(.success(decodedResponse))
            }
            urlTask.resume()
        }
In the above method, we are utilizing Apple’s URLSession data task to create a network request. We are handling the success and failure scenarios with the Result type Result<T, NetworkError>). @escaping attribute - Preserved to be executed later, Pass the closure as a function argument and Asynchronous.
Reactive Combine Framework
We need to import the Combine framework to our Network Kit.
    import Combine

    func sendRequest<T>(endpoint: EndPoint, type: T.Type) -> AnyPublisher<T, NetworkError> where T : Decodable {
            guard let urlRequest = createRequest(endPoint: endpoint) else {
                precondition(false, "Failed URLRequest")
            }
            return URLSession.shared.dataTaskPublisher(for: urlRequest)
                .subscribe(on: DispatchQueue.global(qos: .background))
                .tryMap { data, response -> Data in
                    guard let response = response as? HTTPURLResponse, 200...299 ~= response.statusCode else {
                        throw NetworkError.invalidURL
                    }
                    return data
                }
                .decode(type: T.self, decoder: JSONDecoder())
                .mapError { error -> NetworkError in
                    if error is DecodingError {
                        return NetworkError.decode
                    } else if let error = error as? NetworkError {
                        return error
                    } else {
                        return NetworkError.unknown
                    }
                }
                .eraseToAnyPublisher()
        }
-
dataTaskPublisher(for:) — Returns a publisher that wraps a URL session data task for a given URL.
-
subscribe(on:options:) — Specifies the scheduler on which to perform subscribe, cancel, and request operations. Here, I have used the Global queue with background priority.
-
tryMap(_:) — Transforms all elements from the upstream publisher with a provided error-throwing closure. We can throw the error and return the data we require.
-
decode(type:decoder:) — Decodes the output from the upstream using a specified decoder. We are using JSONDecoder for Decoding the data from the network service and parsing it to our model objects.
-
mapError(_:) — Converts any failure from the upstream publisher into a new error. In case of decode or unknown error, we can understand at this point.
-
eraseToAnyPublisher() — Wraps this publisher with a type eraser. This form of type erasure preserves abstraction across API boundaries, such as different modules.
Structured Concurrency — Async-await
Please watch the WWDC’21 for a better understanding of Structured Concurrency.
Async-Await is the modern concurrency that works well with Swift programming.
    func sendRequest<T: Decodable>(endpoint: EndPoint) async throws -> T {
            guard let urlRequest = createRequest(endPoint: endpoint) else {
                throw NetworkError.decode
            }
            return try await withCheckedThrowingContinuation { continuation in
                let task = URLSession(configuration: .default, delegate: nil, delegateQueue: .main)
                    .dataTask(with: urlRequest) { data, response, _ in
                        guard response is HTTPURLResponse else {
                            continuation.resume(throwing: NetworkError.invalidURL)
                            return
                        }
                        guard let response = response as? HTTPURLResponse, 200...299 ~= response.statusCode else {
                            continuation.resume(throwing:
                                                    NetworkError.unexpectedStatusCode)
                            return
                        }
                        guard let data = data else {
                            continuation.resume(throwing: NetworkError.unknown)
                            return
                        }
                        guard let decodedResponse = try? JSONDecoder().decode(T.self, from: data) else {
                            continuation.resume(throwing: NetworkError.decode)
                            return
                        }
                        continuation.resume(returning: decodedResponse)
                    }
                task.resume()
            }
        }
withCheckedThrowingContinuation(function:_:) — Invokes the passed-in closure with a checked continuation for the current task.
    func withCheckedThrowingContinuation<T>(
        function: String = #function,
        _ body: (CheckedContinuation<T, Error>) -> Void
    ) async throws -> T
- body A closure that takes a CheckedContinuation parameter.
- The withCheckedThrowingContinuation function lifts completion blocks with errors up to throwing async Swift functions.
- This is an alternative to basic async await where we can throw the error and return the output.
I have explained before that it is important for our application to adhere to the Dependency Inversion Principle.
Please find the Networkable protocol that includes all three networking variants: Async-await, Combine, and @escaping closure.
    protocol Networkable {
        func sendRequest<T: Decodable>(endpoint: EndPoint) async throws -> T
        func sendRequest<T: Decodable>(endpoint: EndPoint, resultHandler: @escaping (Result<T, NetworkError>) -> Void)
        func sendRequest<T: Decodable>(endpoint: EndPoint, type: T.Type) -> AnyPublisher<T, NetworkError>
    }
The implementation will be in the NetworkService class that conforms to the Networkable protocol
    final class NetworkService: Networkable {
        func sendRequest<T>(endpoint: EndPoint, type: T.Type) -> AnyPublisher<T, NetworkError> where T : Decodable {
            // Implementation
        }
        func sendRequest<T: Decodable>(endpoint: EndPoint) async throws -> T {
            // Implementation
        }
        func sendRequest<T: Decodable>(endpoint: EndPoint, resultHandler: @escaping (Result<T, NetworkError>) -> Void) {
            // Implementation
        }

        // Class requires Initializer
        init() {
        }
    }
Thanks for reading 🚀
If you have questions/suggestion, please add a comment below 👁️🗨️
If you liked this article, please share it with your friends and fellow Developers 🙏


This is a free third party commenting service we are using for you, which needs you to sign in to post a comment, but the good bit is you can stay anonymous while commenting.