iOS — Swift Interview Questions 2023
Cracking the Code: iOS Swift Interview Questions for 2023 — A Comprehensive Guide to Ace Your Job Interview

A curated set of questions and answers
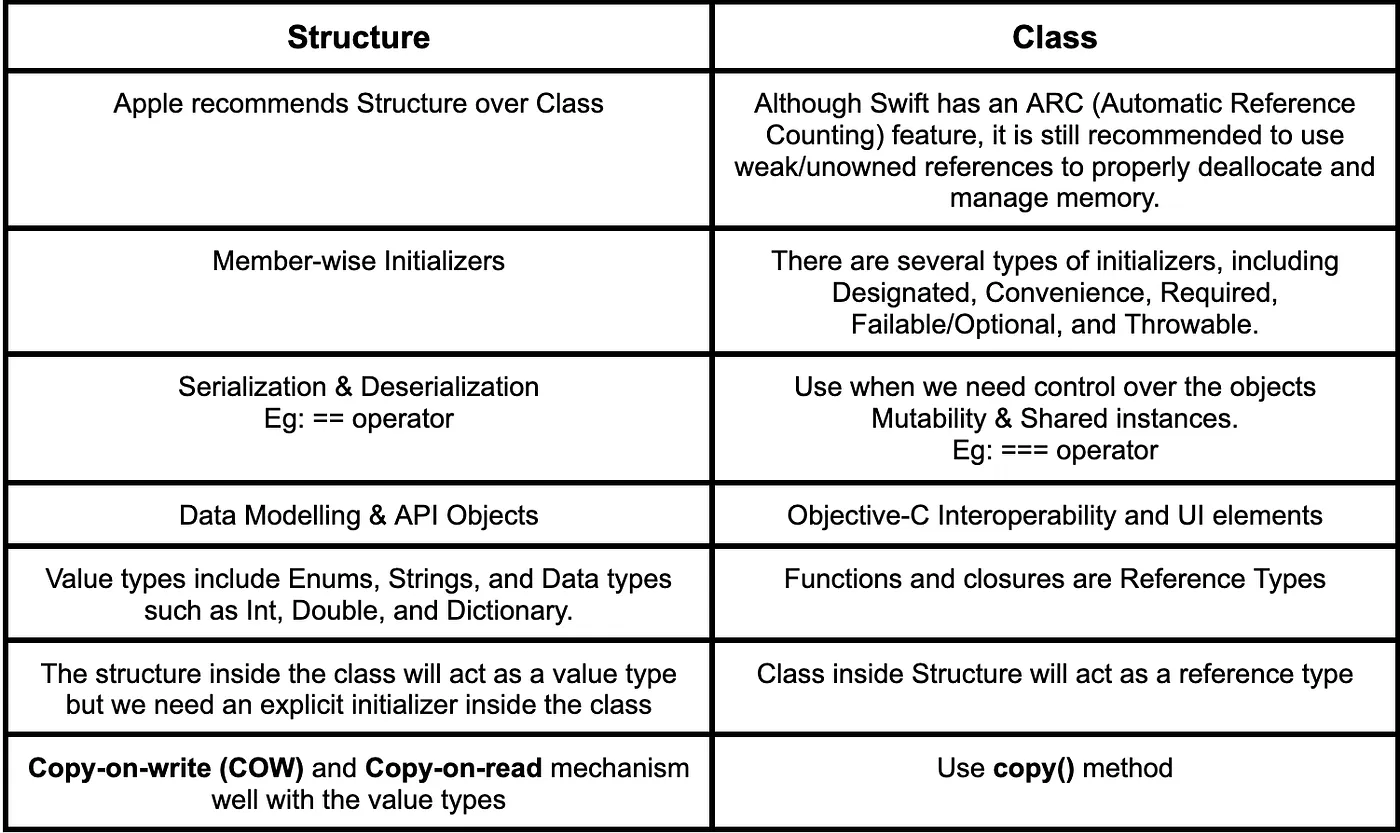
Difference between Class and Structure in Swift
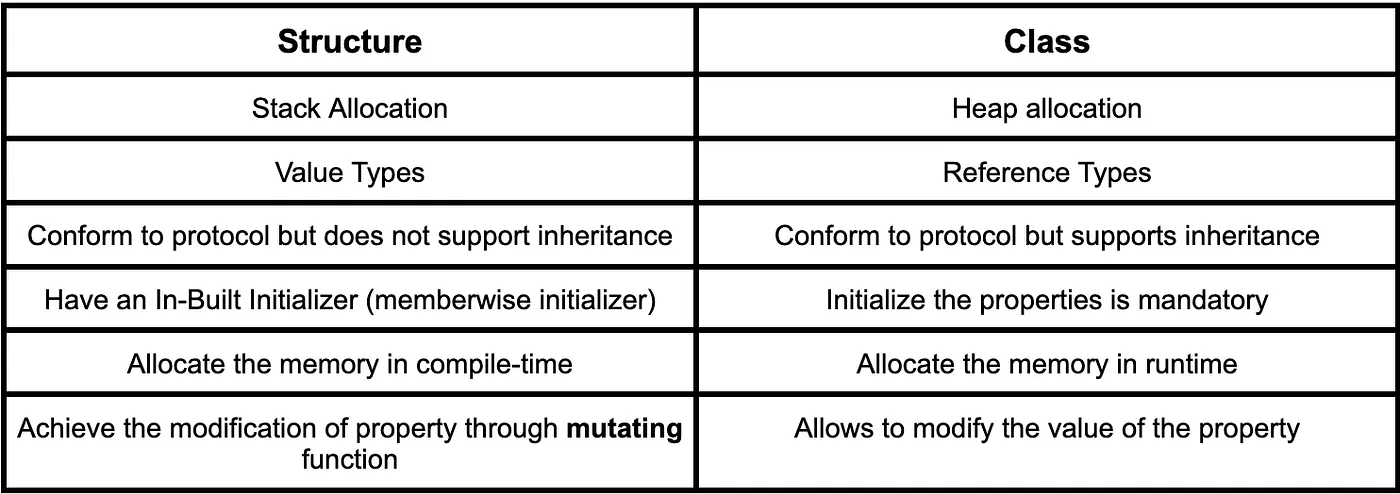
When deciding whether to use a structure or a class, there are various factors to consider.
Delegation Pattern
The most important question that has been frequently asked during the interview sessions.
Delegate Pattern is a Design Pattern that enables one object to send messages to another object when a particular event occurs. This can be accomplished in Swift using a Protocol.
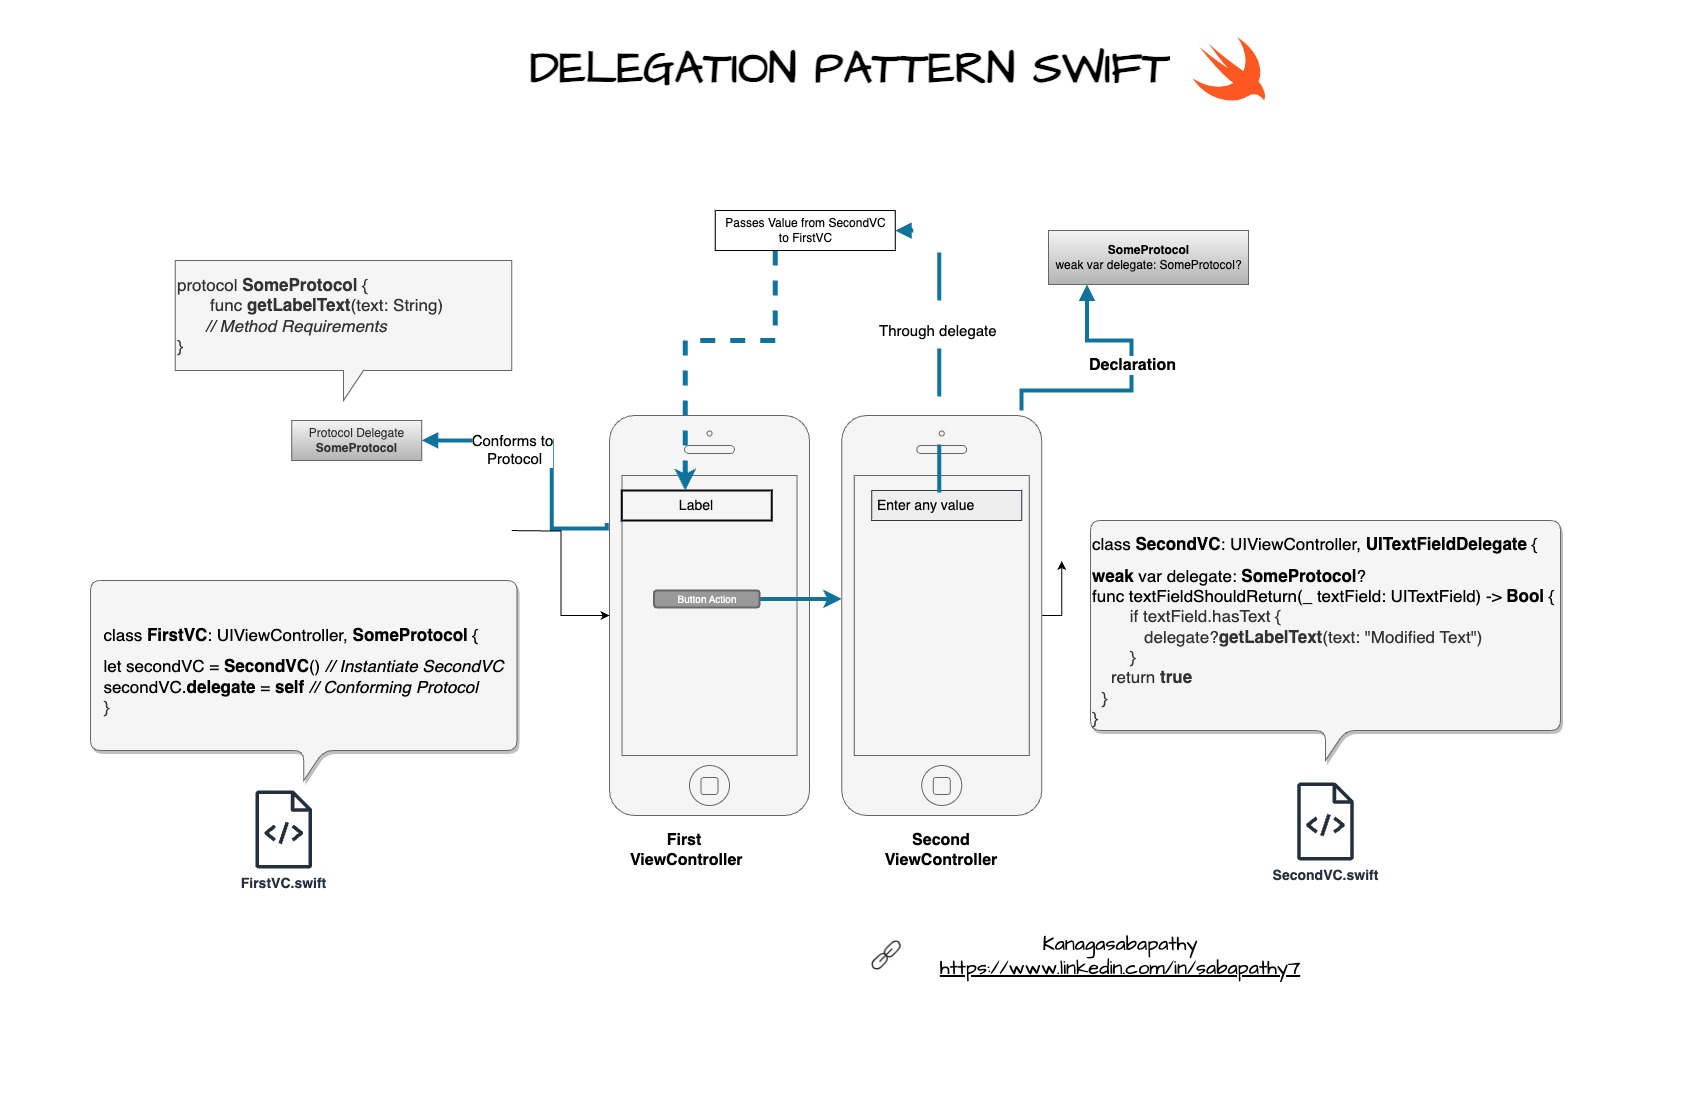
Example of Delegation Pattern Using Protocol
    // SomeProtocol.swift
    protocol SomeProtocol{ //
      func modifyTextToLabel(someText: String)
    }
Protocol: Created SomeProtocol.swift and added a method to modify the text to the label of ViewController.
    // FirstViewController.swift
    class FirstViewController: UIViewController{
      private lazy var someLabel: UILabel = {
        let label = UILabel()
        label.frame = CGRect(x: 100, y: 150, width: 100, height: 50)
        label.text = "Default"
        return label
      }()
      private lazy var someButton: UIButton = {
        let button = UIButton(frame: CGRect(x: 100, y: 200, width: 100, height: 50))
        button.setTitle("Press ME!", for: .normal)
        button.backgroundColor = .red
        button.addTarget(self, action: #selector(handleButtonTapped), for: .touchUpInside)
        return button
      }()
      override func viewDidLoad() {
        super.viewDidLoad()
        view.backgroundColor = .white
        view.addSubview(someLabel)
        view.addSubview(someButton)
      }
    }
ViewController: I have created the FirstViewController and added a label and button using lazy variables. This means that the initialization or computation will be delayed until it is needed.
    // SecondViewController.swift
    class SecondViewController: UIViewController, UITextFieldDelegate {
      lazy var someTextField: UITextField = {
        let textField = UITextField(frame: CGRect(x: 100, y: 100, width: 100, height: 60))
        textField.placeholder = "Enter Text"
        textField.keyboardType = .default
        return textField
      }()
      override func viewDidLoad() {
        super.viewDidLoad()
        view.backgroundColor = .white
        view.addSubview(someTextField)
        someTextField.delegate = self
      }
      func textFieldShouldReturn(_ textField: UITextField) -> Bool {
        return true
      }
    }
ViewController — Created another ViewController — SecondViewController and added a text field to get the user input. someTextField will conform to the UITextFieldDelegate protocol.
    class FirstViewController: UIViewController, SomeProtocol {
      func modifyTextToLabel(someText: String) {
        self.someLabel.text = someText
      }
    }
FirstViewController conforms to the SomeProtocol and inherited the requirements (or methods).
    class SecondViewController: UIViewController, UITextFieldDelegate {
    weak var delegate: SomeProtocol? // weak variable to avoid retain cycles

    func textFieldShouldReturn(_ textField: UITextField) -> Bool {
        if textField.hasText {
          delegate?.modifyTextToLabel(someText: textField.text ?? "")
          navigationController?.popToRootViewController(animated: true)
          return true
        }
        return false
      }
    }
“delegate” variable holds SomeProtocol and acts as Delegate between SecondViewController and FirstViewController. Assigned to weak reference to avoid retain cycles.
Here, “modifyTextToLabel” is a delegate method that helps in passing the data from SecondViewController to FirstViewController. Hence, the text of “someLabel” of the FirstViewController will be modified.
Did you know why Protocol using AnyObject?
Due to memory management, we have stored the delegate object in a weak property. However, we are encountering an issue where Xcode is throwing an error and preventing the code from running.
    'weak' must not be applied to non-class-bound 'MyDelegate';
     consider adding a protocol conformance that has a class bound
To eliminate this, we need to have a class-only protocol.
    protocol SomeProtocol: AnyObject {
      func modifyTextToLabel(someText: String)
    }
Weak references are only applicable to reference types, which means value types such as structures or enumerations cannot conform to this protocol — SomeProtocol.
If an object conforming to the protocol needs to be stored in a weak property then the protocol must be class-only protocol.
What runtime checks do you follow in your Swift project?
During the iOS Development, we should ensure all the sanity checks have been performed before releasing the app to App Store.
- Precondition
- Assertion
- Fatal Error
- Guard
Precondition
Check a condition before proceeding with the code. If a condition evaluates fail, the program execution will be stopped.
Works well with both Production and Development
    func preCondition(willRun: Bool) {
      precondition(willRun)
      print("Called \(#function) successfully")
    }
    preCondition(willRun: true) // Called preCondition(willRun:) successfully
    preCondition(willRun: false) // Precondition failed: Must set willRun to true

    func preConditionFailure(){
      preconditionFailure("It will not run")
    }
    preConditionFailure()  // Fatal Error: It will not run
Assertion
Good in Testing Driven Development (TDD). We can eliminate the issue during development and can be fixed early.
Works well with Development.
    func assertion(willRun: Bool) {
      assert(willRun)
      print("Called \(#function) successfully")
    }
    assertion(willRun: true) // Called assertion(willRun:) successfully
    assertion(willRun: false) // Assertion failed

    func assertionFail() {
      assertionFailure("Expected Failure")
      print("Called \(#function) successfully")
    }
    assertionFail() // Fatal Error: Expected Failure
Fatal Error
Force a crash during some memory issues and always produces an error.
Apple won’t approve the app if this is used in our Production code.
Works well with Development
    func testfatalError() {
      fatalError("FatalError")
    }
    testfatalError() // Fatal Error: FatalError
We can make use of fatalError() in the TableView tableView(_:cellForRowAtIndexPath:)
Check out this link for more reference - https://cocoacasts.com/what-is-fatalerror-in-swift-and-when-to-use-it/
Guard
Guard Statement defines different paths (true or false).
Satisfies the following scenarios —
- Early Exit if preconditions are failed
- Happy path — Early Return
- Visibility
- Can be used in the loops such as for and while.
Works well with both Production and Development
    func testGuard(willCall: Bool) {
      guard willCall else {
        print("No Call"
        return
      }
       print("Called \(#function) successfully")
    }
    testGuard(willCall: true) // Called testGuard(willCall:) successfully
    testGuard(willCall: false) // No Call
Why conform the NSObject to the Swift class? Do we require to do so?
Before answering this question, we need to understand the need for NSObject.
What is NSObject?
The NSObject is universally recognized as the base class for all Cocoa Touch classes, including all UIKit classes derived from it.
NSObject is an abstract class.
But we don’t have to inherit UIKit from NSObject in Swift, but we did it with Objective-C.
Benefits: Subclassing NSObject in Swift gets Objective-C runtime flexibility. Key mechanisms such as NSCoding, KVO, and Hashable.
Disadvantage: Performance is the drawback. We will get Objective-C Performance. Swift performs faster than Objective-C.
I would like to conclude that for pure Swift programming, we should avoid subclassing the NSObject.
What is POP?
At WWDC 2015, Apple announced that Swift is the world’s first Protocol-Oriented Programming (POP) language.
Definition of Protocol
The protocol is the blueprint of the methods, properties, subscripts, and so on that suit a particular task or functionality. Can be adopted by classes, structures, or enumerations to provide the actual implementation of the requirements.
If the requirements are satisfied, then it is called conform to protocol. The entire Swift Library is based on Protocols.
    protocol Epics {
      func isAMovie()
    }

    protocol Myths {
      func isAMyth()
    }
Extensions
Extension can extend the properties or methods of existing types without modifying actual implementation. Optional methods can be achieved through extensions.
Extension — Default Implementation: Default implementation to any property or method. Override methods defined in the parent class.
    extension Epics {
      func isABook() {
        print("Yes, isABook")
      }
    }
Protocol conforming to another protocol: A Protocol can conform all the requirements to another protocol. We can achieve multiple inheritance using Protocol.
Protocol Inheritance and Protocol Composition are both excellent examples of protocols.
Protocol Inheritance vs Protocol Composition Before going to this topic, let’s understand the basic concepts.
What is Inheritance Inheritance is OOP Paradigm and it means “subclassing the superclass”. A subclass may override the properties or methods by altering the default behaviour.
Do value types support inheritance? No. Structures or enums don’t support inheritance.
What is Composition Composition is a combination of multiple parts to create a single outcome.
Do Structs works with Composition? Structure works well with the composition. Provides Better performance and memory safety.
Protocol Inheritance In Swift, the protocol can inherit from other protocols, requiring to conform types to provide an implementation for all properties and methods in the entire hierarchy. The protocol can conform or inherit from other protocols and be separated by commas.
    protocol FirstProtocol {
      var firstName: String {get}
    }
    protocol SecondProtocol {
      var lastName: String {get}
    }
    struct Person: FirstProtocol, SecondProtocol {
      var firstName: String = "First Name"
      var lastName: String = "Last Name"
    }

    let person = Person()
    print(person.firstName)
    print(person.lastName)
Protocol Composition Enables combining multiple protocols into a single requirement without defining new protocol type or new protocol hierarchy. Achieves Multiple Inheritance. List as many protocols and separated them with the ampersand (&).
    protocol FirstProtocol {
      var firstName: String {get}
    }
    protocol SecondProtocol {
      var lastName: String {get}
    }
    struct Person: FirstProtocol & SecondProtocol {
      var firstName: String = "First Name"
      var lastName: String = "Last Name"
    }

    let person = Person()
    print(person.firstName)
    print(person.lastName)
Swifty Approach We can make use of the Swifty approach by using “typealias” to clean the concatenation of protocols when it is messy and also reusable.
    typealias SingleProtocol = FirstProtocol & SecondProtocol
    protocol FirstProtocol {
      var firstName: String { get }
    }
    protocol SecondProtocol {
      var secondName: String { get }
    }
    struct NewStruct: SingleProtocol {
      var firstName: String = "FirstName"
      var secondName: String = "SecondName"
    }

    let newStruct = NewStruct()
    print(newStruct.firstName)
    print(newStruct.secondName)
What is typealias? Typealias is a function that gives a new name or alias to an existing type. It can be a concrete type, complex structure, custom structure, or closure type. This will help make our code more readable and easy to maintain.
Choosing Between Protocol Inheritance and Protocol Composition Use Protocol Composition — when the type conforms to multiple protocols simultaneously without introducing a new hierarchy.
Protocol Inheritance — To create a new protocol that builds upon the existing protocol’s requirements, extending its functionality.
Concrete Type vs Abstract Type Within the Swift programming language, there exist various types of categories, including Concrete Types and Abstract Types, which are the two fundamental concepts.
What is Concrete Type? Concrete type refers to the specific type that can be directly instantiated to create objects.
We can define all properties and methods Classes and Structures are examples of concrete types
Simple Concrete Type
    struct Person {
      var name: String
      var age: Int
    }
    let person = Person(name: "John", age: 20)
    print("Person name \(person.name)  Age  \(person.age)")
Concrete type using Class
    class Employee {
      var name: String
      var age: Int
      init(name: String, age: Int) {
        self.name = name
        self.age = age
      }
      func empActiveStatus() {
        print("Active")
      }
    }

    let employee = Employee(name: "Jones", age: 35)
    print("Employe name \(employee.name)  Age  \(employee.age)")
    print("Active Status \(employee.empActiveStatus())")
What is Abstract Type? An abstract type is a type that defines a set of requirements but does not provide actual implementation.
Requirements refer to properties and methods Abstract type cannot be directly instantiated.
    protocol Shape {
      func area() -> Double
    }
    struct Circle: Shape {
      var radius: Double
      func area() -> Double {
        return Double.pi * radius * radius
      }
    }
    struct Square: Shape {
      var side: Double
      func area() -> Double {
        return side * side
      }
    }

    let circle = Circle(radius: 5.0)
    print("Area of circle: ", circle.area())
    let square = Square(side: 5.0)
    print("Area of square: ", square.area())
How to achieve Abstract type? The primary way to achieve or define abstract type is by using Protocol.
Did you know? A Protocol is an abstract type because it declares a requirement but there is no actual implementation.
To achieve this, we need to have a concrete type that conforms to the protocol and provides concrete implementation.
Summary
- Concrete type can be directly instantiated and used.
- The abstract type defines but does not provide concrete implementation like protocol.
- Defines common interface with multiple concrete types by enabling the Polymorphism
Exception Handling Swift's exception handling or error handling process involves managing errors and exceptions. This process allows for the throwing, catching, and manipulation of errors during runtime.
Ways to Handle the Errors or Exceptions
- do
- try
- catch
- throw
- throws Before handling the exceptions, we need to create an enum of Errors.
Enum of Errors: Create an enum that conforms to the Error Protocol so that we can throw the error value inside the function.
    enum CustomError: Error {
      case someError
    }
do-try-catch — do-catch will allow us to catch and handle the errors thrown from a block of code within the ‘do’ block
    enum CustomError: Error {
      case someError(message: String)
    }
    func someFunction() throws  {
      let randomNum = Int.random(in: 0...1)
      if randomNum == 0 {
        throw CustomError.someError(message: "Error A Occurred")
      } else {
        print("Function Executed successfully")
      }
    }
    do {
      try someFunction()
    } catch CustomError.someError {
      print("Caught a specific Error: CustomError.someError")
    } catch {
      print("Unknown Error \(error)")
    }
Throwing Function — We can throw errors using the throwing functions - the "throws" keyword or use the "throw" keyword inside the block.
    enum CustomError: Error {
      case someError(message: String)
    }
    func someFunction() throws  {
      let randomNum = Int.random(in: 0...1)
      if randomNum == 0 {
        throw CustomError.someError(message: "Error A Occurred")
      } else {
        throw CustomError.someError(message: "Error B Occurred")
      }
    }
    try someFunction()
try — We can use the try function before a function throws an error to indicate that aware of a potential error and how we can handle it.
    protocol SomeProtocol: AnyObject {
      func modifyTextToLabel(someText: String)
    }
try! — We shouldn’t use this function unless we are sure that the function won’t throw any error.
    enum CustomError: Error {
      case someError
    }
    func someFunction() throws -> Int {
      let randomNum = Int.random(in: 0...1)
      if randomNum == 0 {
        throw CustomError.someError
      } else {
        return 100
      }
    }

    do {
      try someFunction()
    } catch CustomError.someError {
      print("Caught a specific Error: CustomError.someError")
    } catch {
      print("Unknown Error \(error)")
    }
try? — Optional but it can contain a response or error. This will disable the catch block and if any error occurs, it will just return nil.
    enum CustomError: Error {
      case someError
    }
    func someFunction() throws -> Int {
      let randomNum = Int.random(in: 0...1)
      if randomNum == 0 {
        throw CustomError.someError
      } else {
        return 100
      }
    }
    let result = try! someFunction()
    print("Result \(result)")
Access Specifiers
Access specifiers are known for the visibility and accessibility of class members, structures, and enums.
Before going to the access specifiers, we must know the following basic things about the iOS Application.
- Module
- Framework
- Source File
- Target
- Bundle
Module — Single unit of code distribution. Imported by using the import keyword.
Target — App bundle or Framework called a separate Module
Source File — Single source file within the same module or the framework or app
Bundle — A Collection of files that make up a build app. Files made up with ipa file
Access Specifiers — used to control the visibility and accessibility of classes, structures, enums, properties, and methods.
Five different Access levels available in Swift are:
- Open
- Public
- Internal
- file private
- Private
- Final
Open
- Most Permissive Access Level.
- Can be accessed from any source file from any module or target or framework.
- Can be subclassed or overridden by external modules.
    import UIKit

    // Module
    class SomeClass {
      var tableView: UITableView = UITableView()
    }

    // From Apple Documentation
    open class UITableView : UIScrollView, NSCoding, UIDataSourceTranslating {

    }

    // Example
    open class MyClass {
      open var property: Int = 0
      open func someFunc() {
      }
    }

    // This will throw an error as we cannot have open structure.
    // Replace 'open' with 'struct'
    open struct MyStruct {

    }
Public
- Similar to the Open Access level but with some limitations.
- Can be accessed from any source file from any module or target or framework.
- Cannot be subclassed or overridden by external modules.
For example, we can try public by using the UIKit framework
    public class SomeButtonView: UIButton {
      public func setButtonTitle(_ title: String) {
        setTitle(title, for: .normal)
      }
    }
Internal
- Default Access Level in Swift.
- Can be accessed from any source file from the same module or target or framework but cannot be done from external modules.
- Useful for defining internal implementation details.
    // Internal class and internal functions
    internal class InternalViewController: UIViewController {
      internal override func viewDidLoad() {
        super.viewDidLoad()
        setupUI()
      }
      private lazy var label: UILabel = {
        let label = UILabel(frame: CGRect(x: 0, y: 0, width: 200, height: 200))
        label.text = "Internal Label View"
        label.textAlignment = .center
        label.font = .systemFont(ofSize: 12, weight: .bold)
        label.numberOfLines = 1
        label.textColor = .blue
        label.sizeToFit()
        return label
      }()
      private func setupUI() {
        view.addSubview(label)
      }
    }
file private
- Can be accessed from within the same source file.
- Useful for hiding implementation details in a single source file.
Please look into an example of fileprivate and private in same file.
    class Employee {
      fileprivate var firstName: String
      private var nickName: String
      init (firstName: String, nickName: String) {
        self.firstName = firstName
        self.nickName = nickName
      }
      fileprivate func updateFirstName(){}
      private func updateNickName() {}
    }
    class FetchRecords: Employee {
      func getEmployee() -> String {
        updateFirstName() // Accessible
        return firstName // Accessible
      }
      func getAnotherEmployee() -> String {
        updateNickName() //'updateNickName' is inaccessible due to 'private' protection level
        return nickName // 'nickName' is inaccessible due to 'private' protection level
      }
    }
    extension Employee {
      fileprivate func modifyName() {
         print("Employee Name is \(firstName)") // Accessible
        print("Employee Nick Name is \(nickName)") // Accessible
      }
    }
    var employee = Employee(firstName: "Sabapathy", nickName: "Saba")
    employee.modifyName()
Private
- Most Restricted Access Level.
- Can be accessed from within the declaration or extensions of the same source file.
- Used for Encapsulating the implementation details within a specific scope.
Please look into an example of fileprivate and private in different file.
    // Main.swift
    class Employee {
      fileprivate var firstName: String
      private var nickName: String
      init (firstName: String, nickName: String) {
        self.firstName = firstName
        self.nickName = nickName
      }
      fileprivate func updateFirstName(){}
      private func updateNickName() {}
    }

    // Extension.swift
    extension Employee {
      fileprivate func modifyName() {
         print("Employee Name is \(firstName)")
        // name is inaccessible because of 'file-private' protection level
        print("Employee Nick Name is \(nickName)")
        // nickName is inaccessible because of 'private' protection level
      }
    }
Open vs Public
- Open — Applies to class and class members but not structures.
- Can access, subclass, and override the class or class members outside the defined module.
- Public — applies to class, structures, and enums and their members.
- Can access but not subclassing or overriding outside the defined module.
When can we use Open or Public?
- Use Open when we design a public API where others can extend it and modify the implementation outside the module.
- Use Public when other modules can access them but not extend or modify them.
When to use Internal?
- Internal plays an important role when we create a framework and will not allow other modules/frameworks to access the entities.
- Another good example is when we work on large-scale projects with multiple modules/frameworks.
When to use File-Private and Private?
- Use private when we have a data model that contains user information. Thus, it will prevent modifying the data.
- Use file-private for utility classes or helper classes. This will help in hiding the implementation details and prevent accessing or relying on them.
- Don’t forget about the Final in Swift
Use final when you do the following
- Prevent the class in the framework for subclassing.
- Other than class, we can mark for properties and methods.
- Static Dispatch can be achieved and the performance will be increased.
- We can use it to prevent overriding the methods in the framework and avoid issues.
Higher Order Functions in Swift
Functional Programming — Code empowers to handle functions as essential building blocks. Manipulate functions and extract useful outcomes from them.
Higher Order functions
map filter reduce compactMap sorted ForEach flatMap
What is Transform
A Mapping closure that accepts and returns a transformed value of the same or a different type.
map — Returns an array by applying mapping closure to each element of the sequence.
An array containing the transformed elements of this sequence.
    let firstArr = ["Jones", "Theodore", "Saba", "Pathy"]
    let mapArr = firstArr.map { element in
        element.lowercased()
    }
    print(mapArr)
Example with Model
    struct Employee {
    let name: String
    let age: Int
    }
    let empArr = [
        Employee(name: "Saba", age: 30),
        Employee(name: "Pathy", age: 30)
    ]
    let employees = empArr.map { $0.name }
    print(employees)
    // ["Saba", "Pathy"]
flatMap — Use to receive a single collection or sequence. Flattened Array
Complexity — O(m+n)
n = sequence length and m = result length
Works well with Optionals s.flatMap(transform) = Array(s.map(transform).joined())
    let optionalNum: [Int]? = [1,2,3,4,5]
    let flatOptionalNum =  optionalNum.flatMap { $0 }
    print(flatOptionalNum)
    // Optional(11,2 ,3 ,4 ,51)
compactMap — Returning an array of non-nil elements of transform with each element of Sequence. Resulting non-optional elements.
Complexity — O(n)
    let possibleNumbers =「"1","2","three","///4///","'5"]
    let compactMapped: [Int] = possibleNumbers.compactMap { str in Int(str) }
    print (compactMapped)
    // [1, 2, 5]
Useful working with Optionals.
    let optionalValues = ["1", "2", nil , nil, "5"]
    let compactValues = optionalValues.compactMap { $0 } print(compactValues)
reduce — Returns result from combining the elements of the sequence using the given closure.
    func reduce<Result>(
      _ initialResult:Result,
      _ nextPartialResult:(Result,Self.Element) throws → Result
    ) rethrows- >Result
If the sequence has no elements, the result is the Initial Result.
    let numbers = [1, 2, 3, 4]
    let numberSum = numbers.reduce(0, { x, y in
        x + y
    })
    print(numberSum)
filter — Filtering the array of elements by satisfying the requirements. Parameter — isIncluded
    let names = ["Jones", "saba", "Kanagasabapathy", "Rajkumar"]
    let filterNames = names.filter { $0.hasPrefix("s") }
    print(filterNames)
Works with compactMap and Optionals
    let optionalNums = [1,2,nil,3,4,5,nil, nil]
    let filterNums = optionalNums.compactMap { $0 }.filter { $0 > 4}
    print(filterNums)
sorted — Sorting array of sequence’s elements.
Complexity — O(n log n)
Works well when Element conforms to Comparable Protocol.
    let a = [1,2,3,21,23,20,100,50]
    print(a.sorted())
    let b = ["Adam", "John", "Saba", "Alan", "Rowe"]
    print(b.sorted())
sorted(by:)
array in Increasing Order —
    let lastArr = ["Kofi", "Anna", "Peter", "Charlie", "Chaplin"]
    print(lastArr.sorted(by: <))
    //["Anna", "Chaplin", "Charlie", "Kofi", "Peter"]
    print(lastArr.sorted(by: >))
    //["Peter", "Kofi", "Charlie", "Chaplin", "Anna"]
forEach — Similar to a for-in loop but cannot break or continue and return will exit from the current call, not from the scope.
   let arr = ["Kofi", "Anna", "Peter", "Charlie", "Chaplin"]
    arr.forEach { name in
        print(name)
    }
Differences
map — produces a collection.
compactMap — filters out nil values and resulting non-optional
flatMap — flattens the results, allowing for a different type.
reduce — combines all elements into a single value using a closure.
filter — filters based on a condition, producing a collection of the same type.
Iteration
forEach — Applies a closure to each element for side effects without producing a new collection.
Tricky example
    let json = """
    {
      "testArr": [
        {
          "listDate": "2021-08-23",
          "subTitle": "dmuAndSyncBuffer Workfow",
          "mainTitle": "Kanagasabapathy",
          "iconUrl": "defaultInstanceListIcon",
          "priority": [
            {
              "listDate": "2021-08-23",
              "subTitle": "dmuAndSyncBuffer Workfow",
              "mainTitle": "Kanagasabapathy",
              "iconUrl": "defaultInstanceListIcon",
              "priority": 0
            }
          ]
        },
        {
          "listDate": "2021-08-25",
          "subTitle": "dmuAndSyncBuffer Workfow",
          "mainTitle": "Pathy",
          "iconUrl": "defaultInstanceListIcon",
          "priority": [
            {
              "listDate": "2021-08-23",
              "subTitle": "dmuAndSyncBuffer Workfow",
              "mainTitle": "Kanagasabapathy",
              "iconUrl": "defaultInstanceListIcon",
              "priority": 0
            }
          ]
        }
      ]
    }
    """
   // MARK: - TestData
    struct TestData: Codable {
        var testArr: [TestArr]
    }

    // MARK: - TestArr
    struct TestArr: Codable {
        var listDate, subTitle, mainTitle, iconURL: String
        let priority: [Priority]

        enum CodingKeys: String, CodingKey {
            case listDate, subTitle, mainTitle
            case iconURL = "iconUrl"
            case priority
        }
    }

    // MARK: - Priority
    struct Priority: Codable {
        var listDate, subTitle, mainTitle, iconURL: String
        let priority: Int

        enum CodingKeys: String, CodingKey {
            case listDate, subTitle, mainTitle
            case iconURL = "iconUrl"
            case priority
        }
    }
Decode and rename the value of the specific parameter
   let data =  json.data(using: .utf8)
    do {
        let decoder = JSONDecoder()
        let jsonData = try decoder.decode(TestData.self, from: data!)
        print(jsonData.testArr)
        let newData = jsonData.testArr.map { arr in
            var newArr = arr
            if arr.mainTitle == "Kanagasabapathy" {
                newArr.mainTitle = "SABA"
            }
            return newArr
        }
        print("\n Updated Data \(newData)")
    } catch {
        fatalError("Error \(error)")
    }
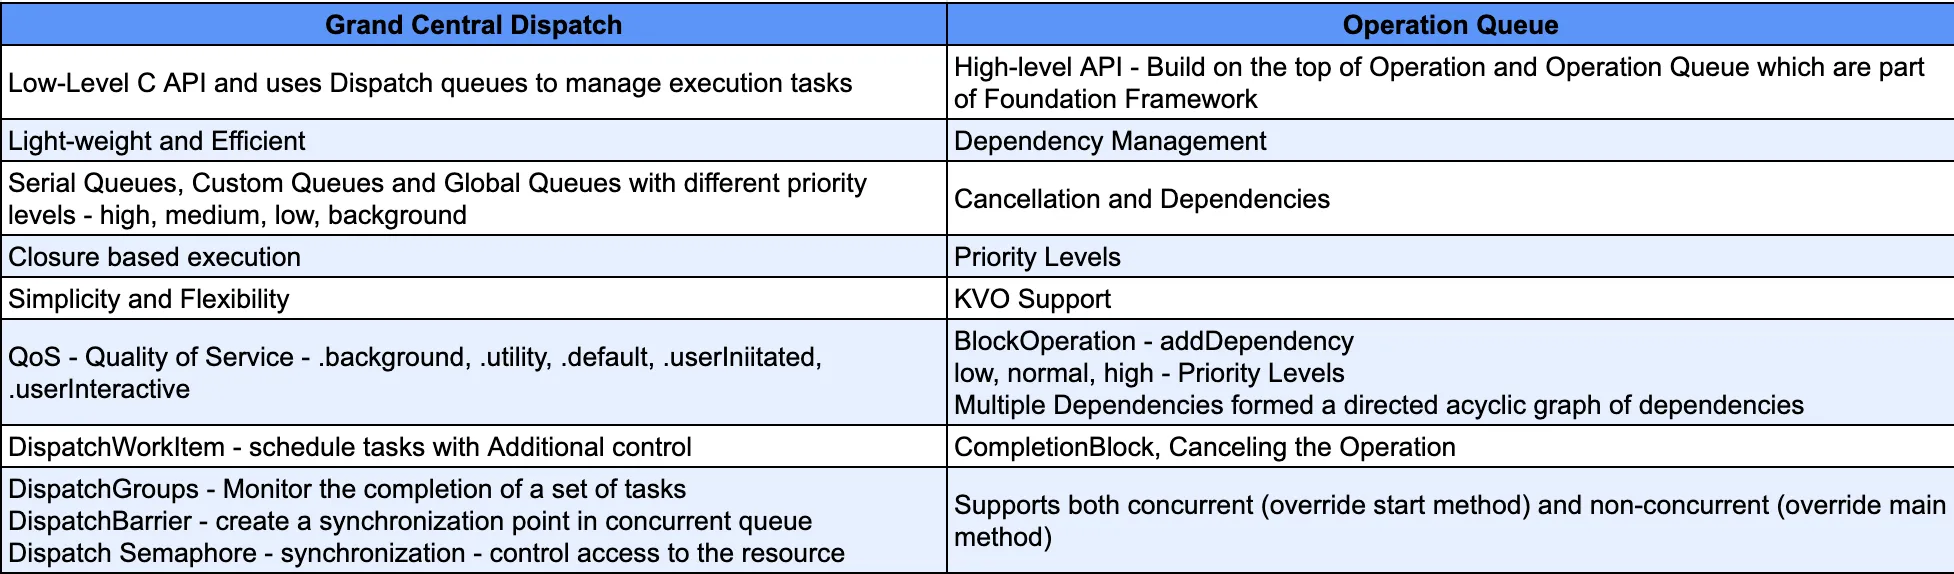
FAQ — Difference b/w OperationQueue vs GCD
Follow me on GitHub
Thanks for reading 🚀
If you have questions/suggestion, please add a comment below 👁️🗨️
If you liked this article, please share it with your friends and fellow Developers 🙏


This is a free third party commenting service we are using for you, which needs you to sign in to post a comment, but the good bit is you can stay anonymous while commenting.