Logo Detector iOS App using CoreML
Ever thought what's Apple's CoreML and CreateML really does, is it really a great addition to our apps, let us see in this article
What you can expect from this blog?
- What is Machine Learning?
- What is CoreML?
- What is the Vision framework?
- What is CreateML?
- How to train a model using CreateML?
- Build a sample image (logo) recognition app
If you torture the data long enough, it will confess to anything.
‒ Ronald H. Coase, a renowned British Economist
What is Machine Learning?
Machine learning (ML) is the study of computer algorithms that improve automatically through experience and by the use of data.
It is seen as a part of artificial intelligence.
These algorithms build a model based on sample data, known as "training data", in order to make predictions or decisions without being explicitly programmed to do so.
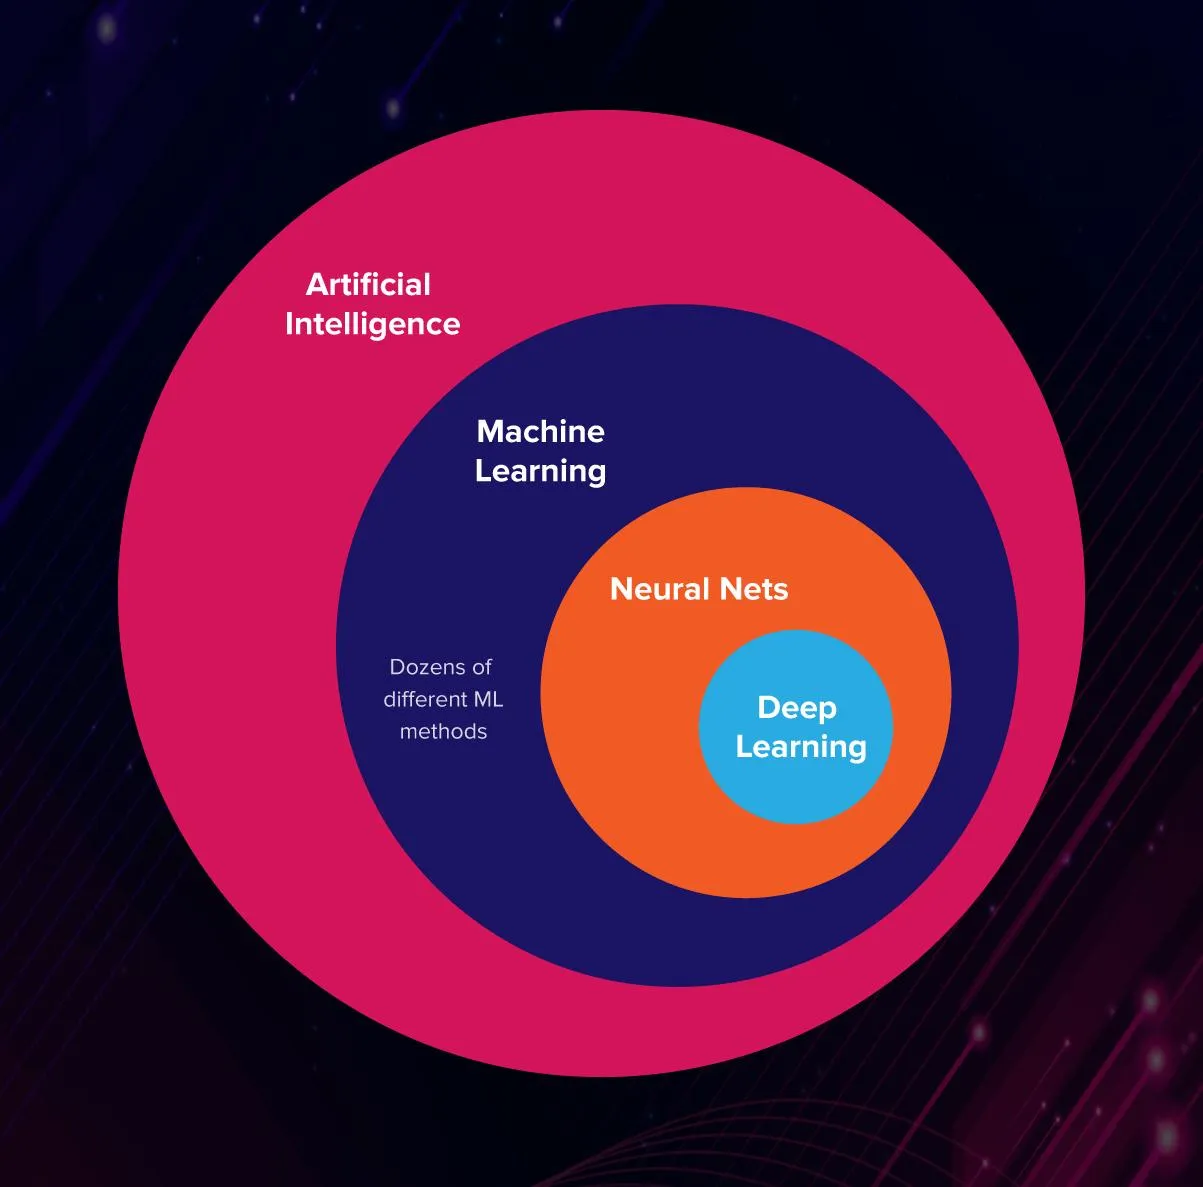
For example, Apple use ML in the photo app to recognise the face and keyboard app to predict the next word suggestion
What is CoreML?
import CoreML

A framework from Apple for integrating machine learning models into your app.
Core ML automatically generates a Swift class that provides easy access to your ML model, CoreML is easy to set up and use in iOS when we have a model dataset
What is a model?
Core ML applies a machine-learning algorithm to a set of training data to create a model. This model is used to make predictions based on new input data. For example, you can train a model to categorize photos or detect specific objects within a photo directly from its pixels.
What is the Vision framework?
import Vision
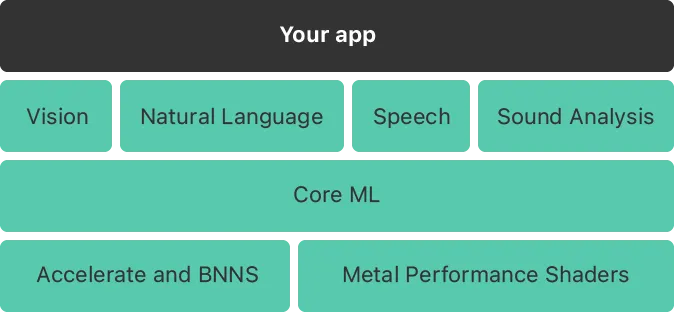
The Vision framework works with Core ML to apply classification models to images, and to preprocess those images to make machine learning tasks easier and more reliable.
A few pre-existing APIs from the Vision framework are Face and Body Detection, Animal Detection, Text Detection, Barcode Detection.
Speech, Natural Language and Sound Analysis
We know Core ML supports Vision for analyzing images the same way it uses Natural Language for processing text,
Use this framework to perform tasks like:
- Language identification automatically detects the language of a piece of text.
- Tokenization, breaking up a piece of text into linguistic units or tokens.
- Parts-of-speech tagging, marking up individual words with their part of speech.
- Lemmatization, deducing a word’s stem based on its morphological analysis.
- Named entity recognition, identifying tokens as names of people, places, or organizations.
Speech for converting audio to text, and Sound Analysis for identifying sounds in the audio
Use the Speech framework to recognize spoken words in recorded or live audio. The keyboard’s dictation support uses speech recognition to translate audio content into text.
What is CreateML?
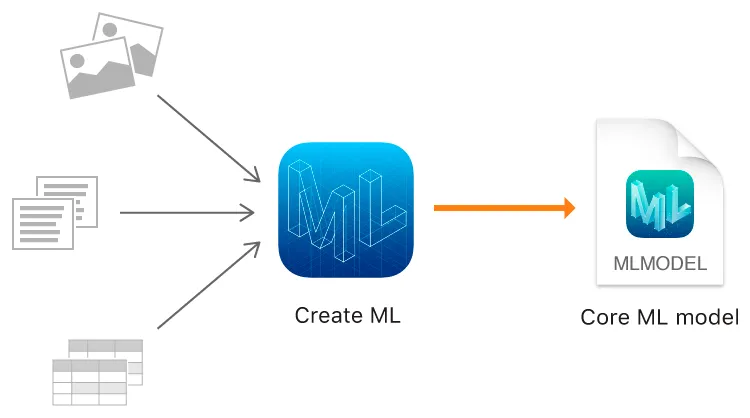
CreateML is a tool provided by Apple (app bundled with Xcode) to create machine learning models(.mlmodel) to use in your app. Other language ML models can also be easily converted into our .mlmodel by CreateML app.
APIs
VNCoreMLRequest - An image analysis request that uses a Core ML model to process images.
VNImageRequestHandler - An object that processes one or more image analysis requests pertaining to a single image.
VNClassificationObservation - Classification information produced by an image analysis request.
VNObservatoinResults - The collection of VNObservation results generated by request processing.
How to train a model using CreateML?
Open CreateML by going to the Xcode menu and clicking Open Developer Tool → CreateML. Then create a new project. Navigate to the Model Sources section in the left panel. This is our model, we are going to train, build and use it. (there is also other ways to generate the MLModel like playgrounds and terminal, feel free to explore them too)
To create the model, we need a logo data set, the same can be obtained from Kaggle (Kaggle, a subsidiary of Google LLC, is an online community of data scientists and machine learning practitioners). Kaggle has thousand of datasets uploaded by various Machine learning developers.
Once you downloaded the dataset. Open the CreateML window and tap on the LogoDetector file at Model Sources. This window has two major columns:
- Data
- Parameters.
Let us focus on the Data column, which consists of :
1. Training Data:
The first step is to provide Create ML with some training data. Open the downloaded folder and drag and drop the train folder into this column.
Tip
For image recognition, try to add augmentations to the image like blur and noise which will improve the accuracy. Increasing the iterations will also improve the accuracy. But, both of these changes will increase the training time.
2. Validation Data:
This validation data is used to check its model: it makes a prediction based on the input, then checks how far that prediction was off the real value that came from the data. The default setting is Automatic - Split from Training Data
3. Testing Data:
Open the downloaded folder and drag and drop the test folder into this column. We will be using the images in Training Data to train our classifier and then use Testing Data to determine its accuracy.
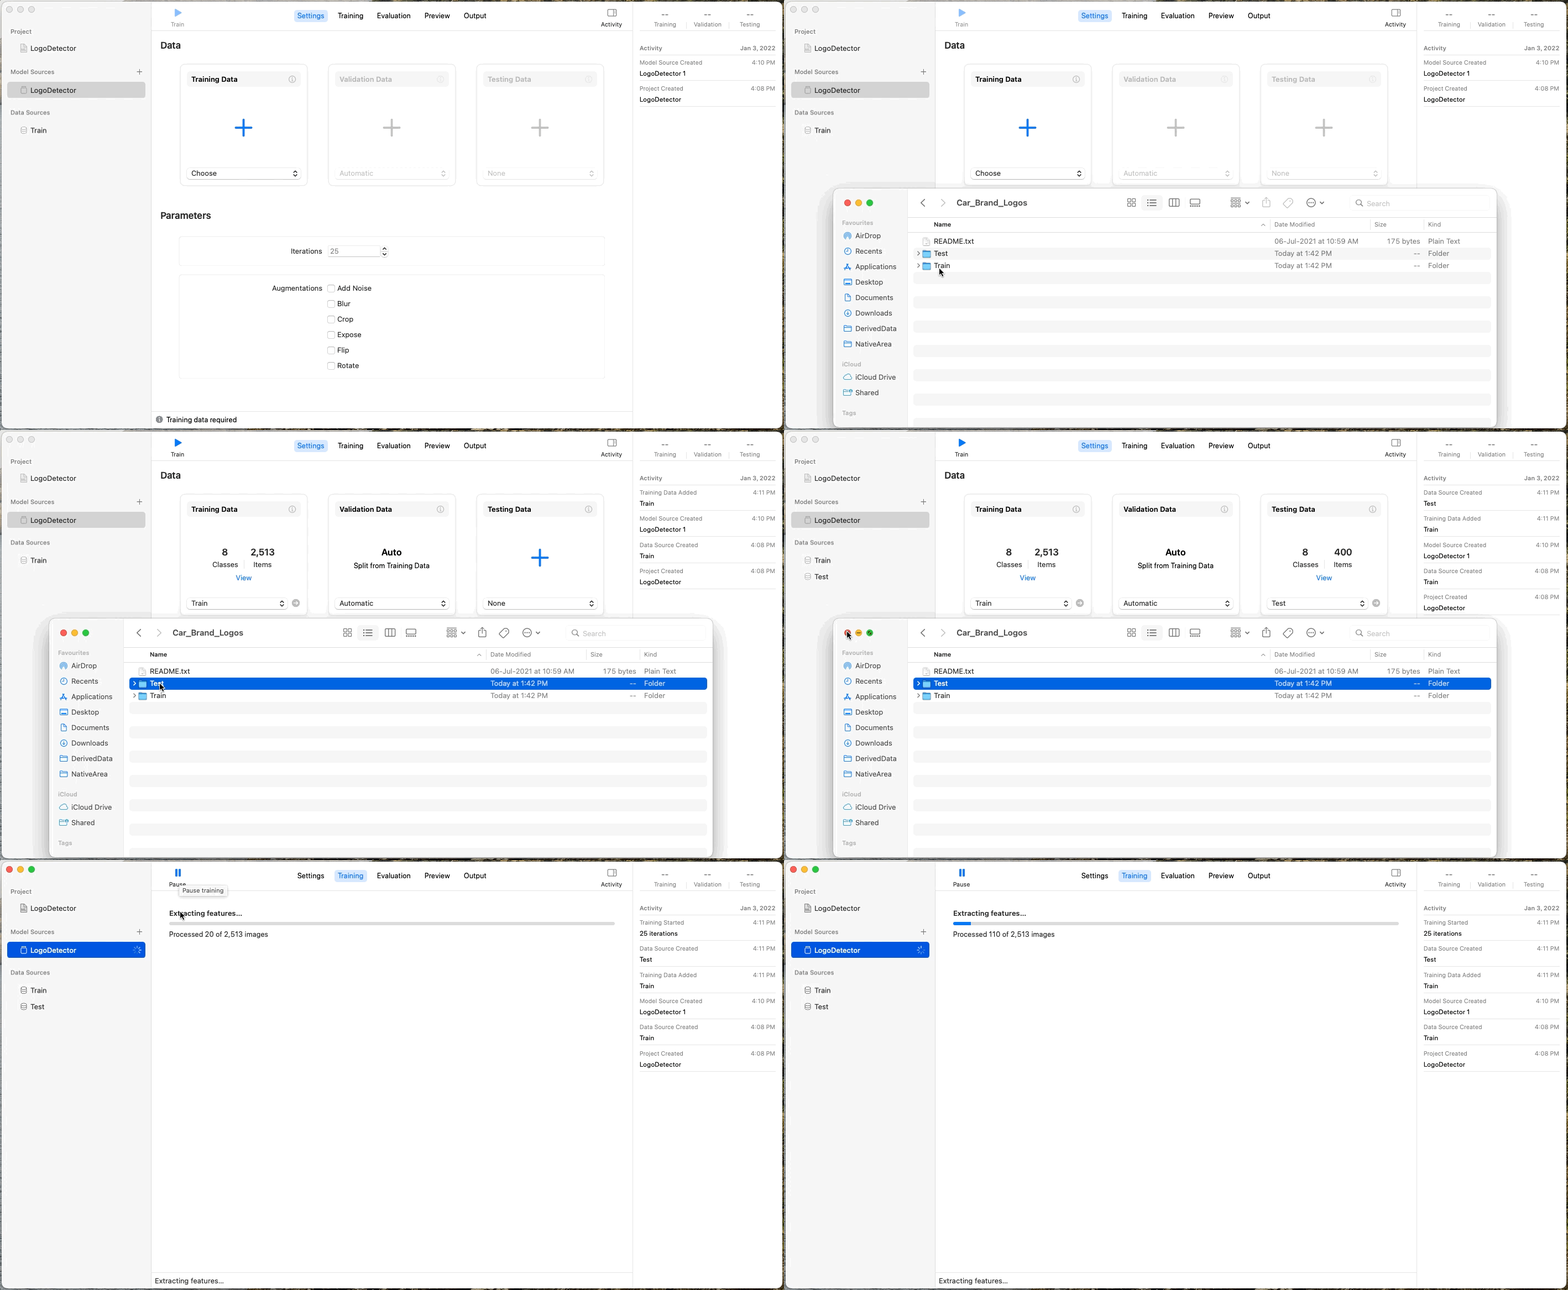
Now click the run button at the top left to start training our model. Once the process is completed, we will be presented with the training data:
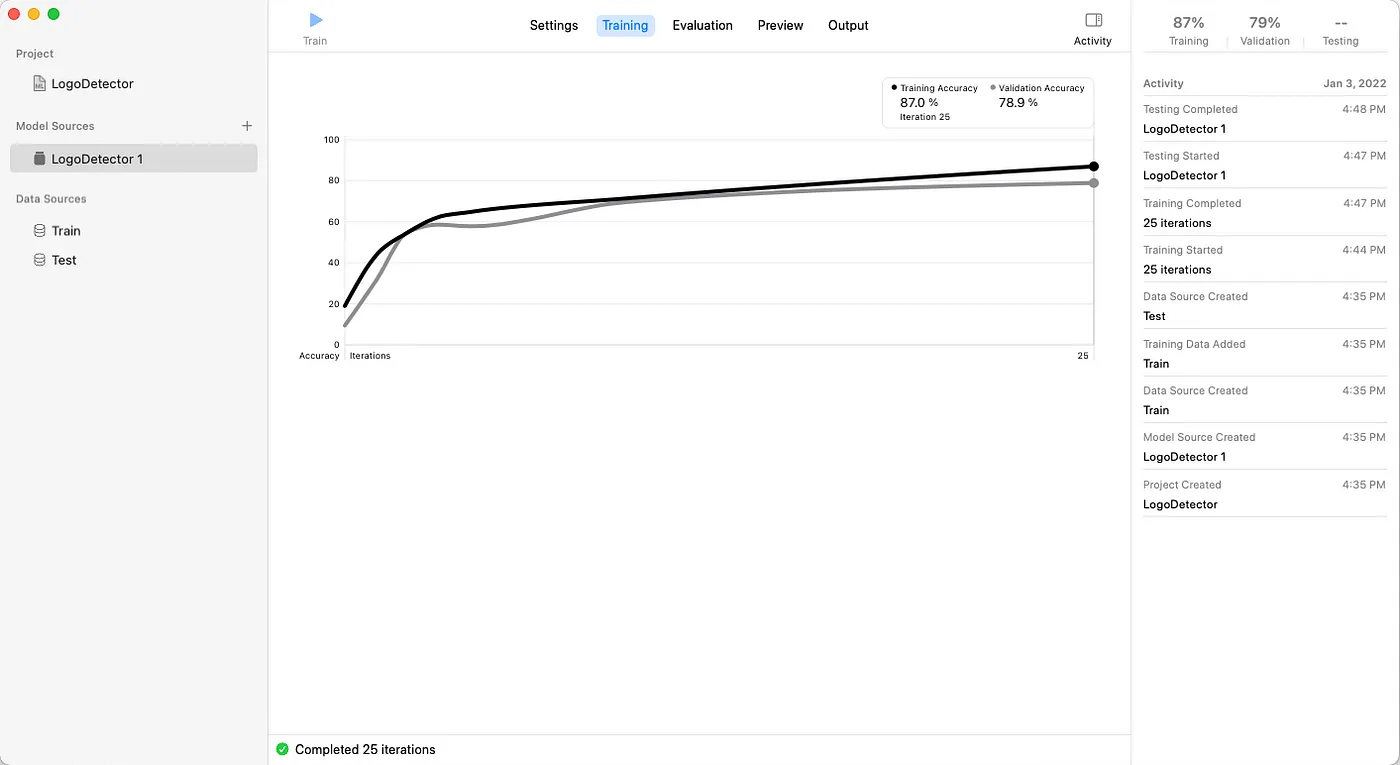
Then it automatically starts the evaluation(testing) process with the testing dataset we provided:
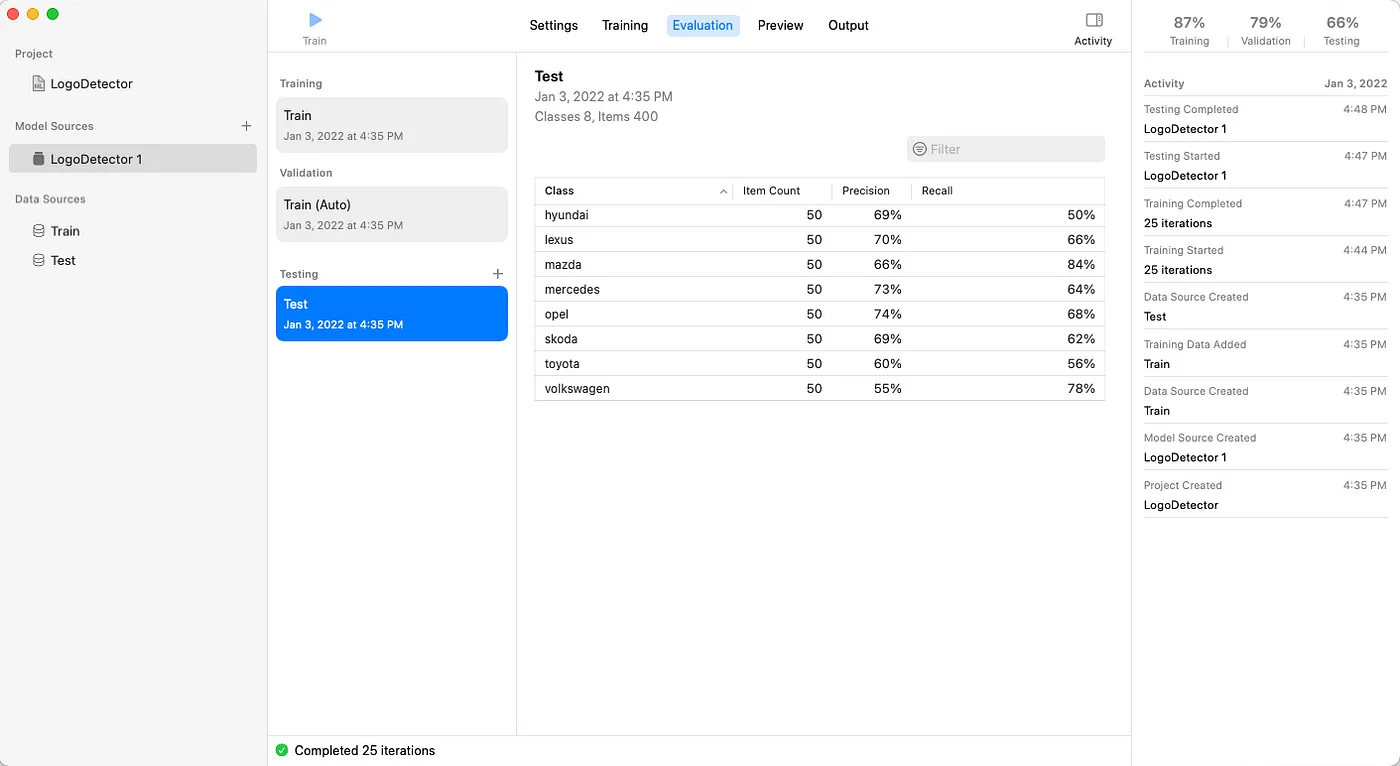
Now our MLModel is ready to be added to the project, tap at the Output tab at the top centre and tap on the ⬇️ Get icon and save it.
Build a sample image(logo) recognition app
Create a new iOS project in Xcode (storyboard one not SwiftUI) and drag-drop the MLModel we created above. Now the goal is to build an app that opens camera view and scan whatever logo (image) captured and validates it with the mlmodel we created and display the result in a label.
The final project can be downloaded from here
- Remove the storyboard file, Remove Main Interface and Remove the Main.storyboard from Info.plist.
- In this tutorial we are going to use the
AVCaptureSessionto capture an image from the camera and process it using CoreML’s Vision framework, hence we need to add a camera permission string ininfo.plist. Right-click Info.plist → Open As Source Code, add the below inside the
<key>NSCameraUsageDescription</key>
<string>Accessing your camera to take photo</string>
- Now let's try to show the camera permission dialogue in
viewDidLoadand try to get user permission to start capturing the images:
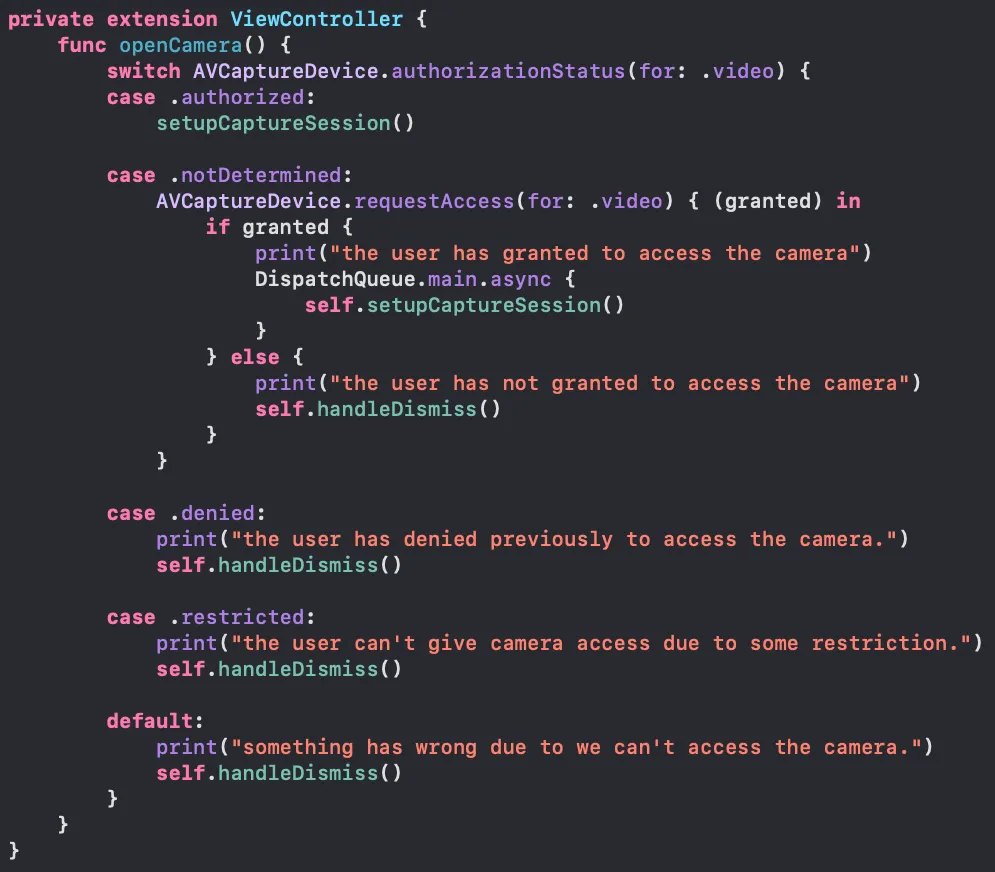
- Once the permission is granted, we need to create an AVCaptureSession.
What is AVCaptureSession?
To perform real-time capture, you instantiate an AVCaptureSession object and add appropriate inputs and outputs.
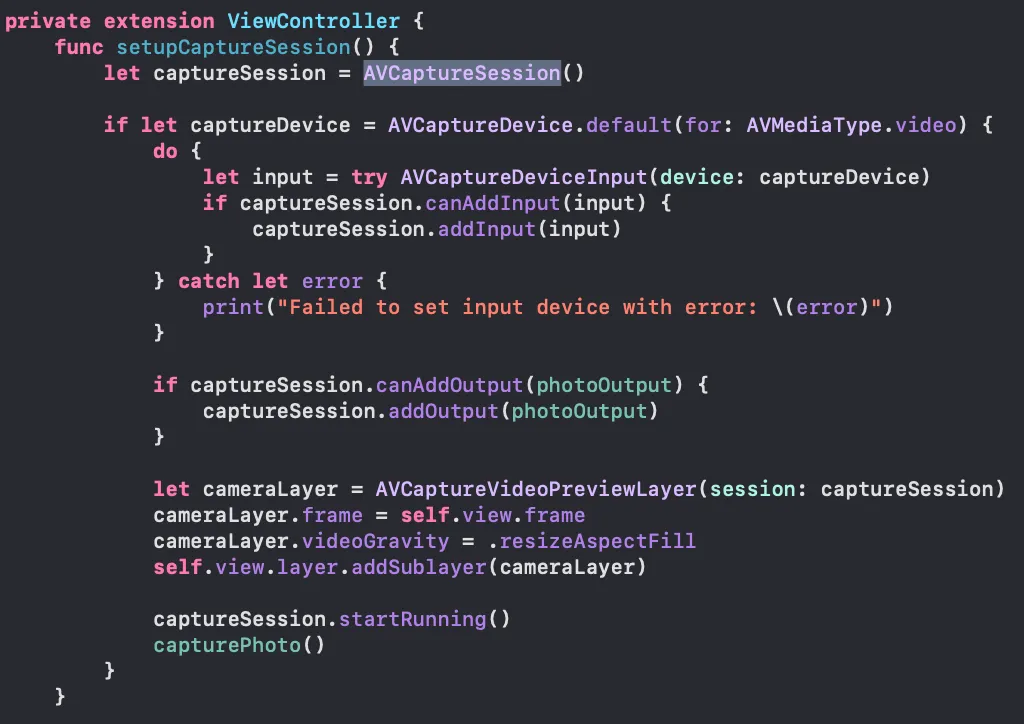
Once AVCaptureSession is instantiated, it requires to add proper input and output for the same. Here the Input is → the Device’s default camera and the media type of camera is video
AVCaptureDevice.default(for: AVMediaType.video) // MediaType
AVCaptureDeviceInput(device: captureDevice)     // Input
For receiving the output from this session, we can create a property at the class level, so that can be accessed anywhere
private let photoOutput = AVCapturePhotoOutput()
Once the I/O setup is configured. Let us add the camera view to the ViewController’s view with the help of AVCaptureVideoPreviewLayer and at last, the session has to be started using
captureSession.startRunning()
This call starts the flow of data from input to output. Now we have configured an AVCaptureSession and added the camera’s view to the ViewController view.
- Since the session is ready, we can start capturing the image via the camera

Here we created an object of AVCapturePhotoSettings thus helping us to customise the settings before capturing the photo, Here we have to call the method capturePhoto() with photo settings and delegate.
- Confirm
AVCapturePhotoCaptureDelegateto the ViewController and add itsphotoOutput()method
func photoOutput(_ output: AVCapturePhotoOutput, didFinishProcessingPhoto photo: AVCapturePhoto, error: Error?)

This method helps us deliver the output from captureSession that is an imageData and a proper image from it.
- Now since we have an image captured from the device, we need to process it with MLModel to get its results:
Here, we created a classificationRequest as of Type VNCoreMLRequest and it needs a model, when we moved the MLModel downloaded from CreateML into the project, Xcode automatically creates a LogoDetector swift class for us. Also, the request provides a completionHandler with VNRequest when a request is received after processing with the model.
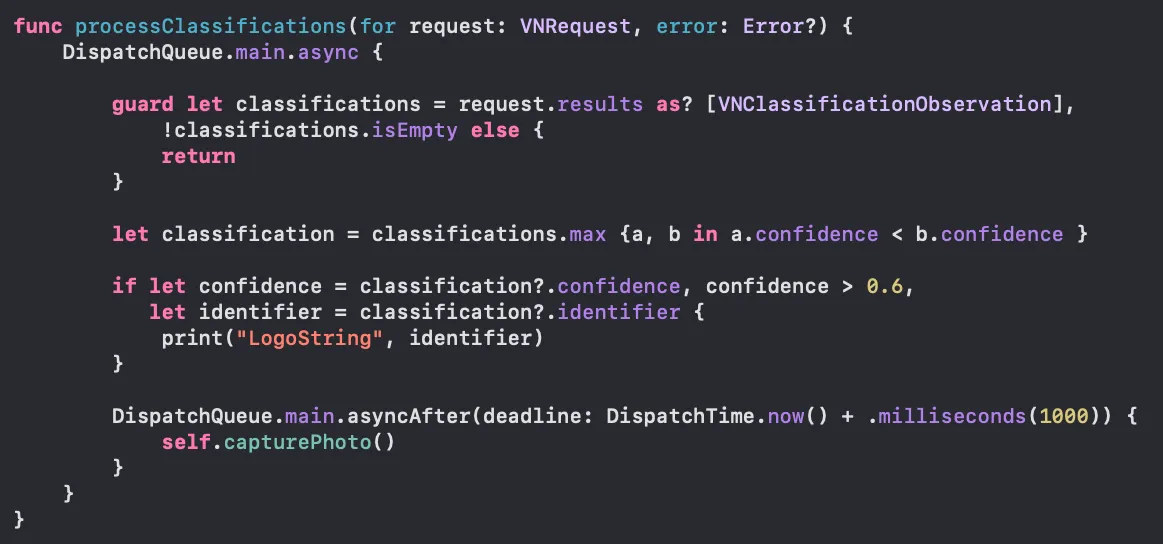
Now the final part is to process the request/result from the model when an image is passed into it.
Here, we receive an array of classifications as part of the result, we filter the element with maximum confidence,
What is a confidence?
The level of confidence normalized to [0, 1] where 1 is most confident
Warning
Confidence can always be returned as 1 ☹️, if confidence is not supported or has no meaning, so play with it carefully
Once we get the logo name, I am starting the capturing session again in a second of delay. (can be customised as of a variety of use-cases)
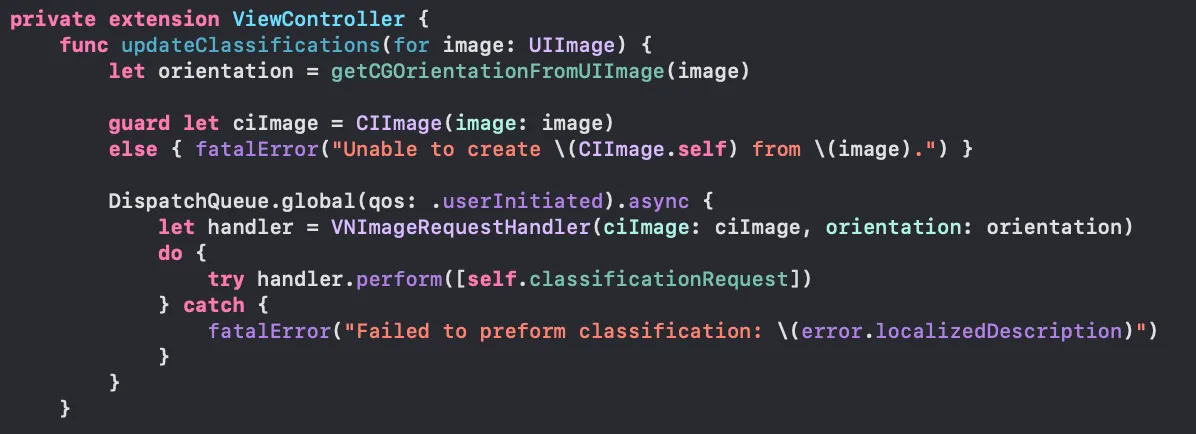
- Whenever we receive an image object from the
photoOutputmethod ofAVCapturePhotoCaptureDelegateit has to be passed into theVNImageRequestHandlerto handle the results like below:
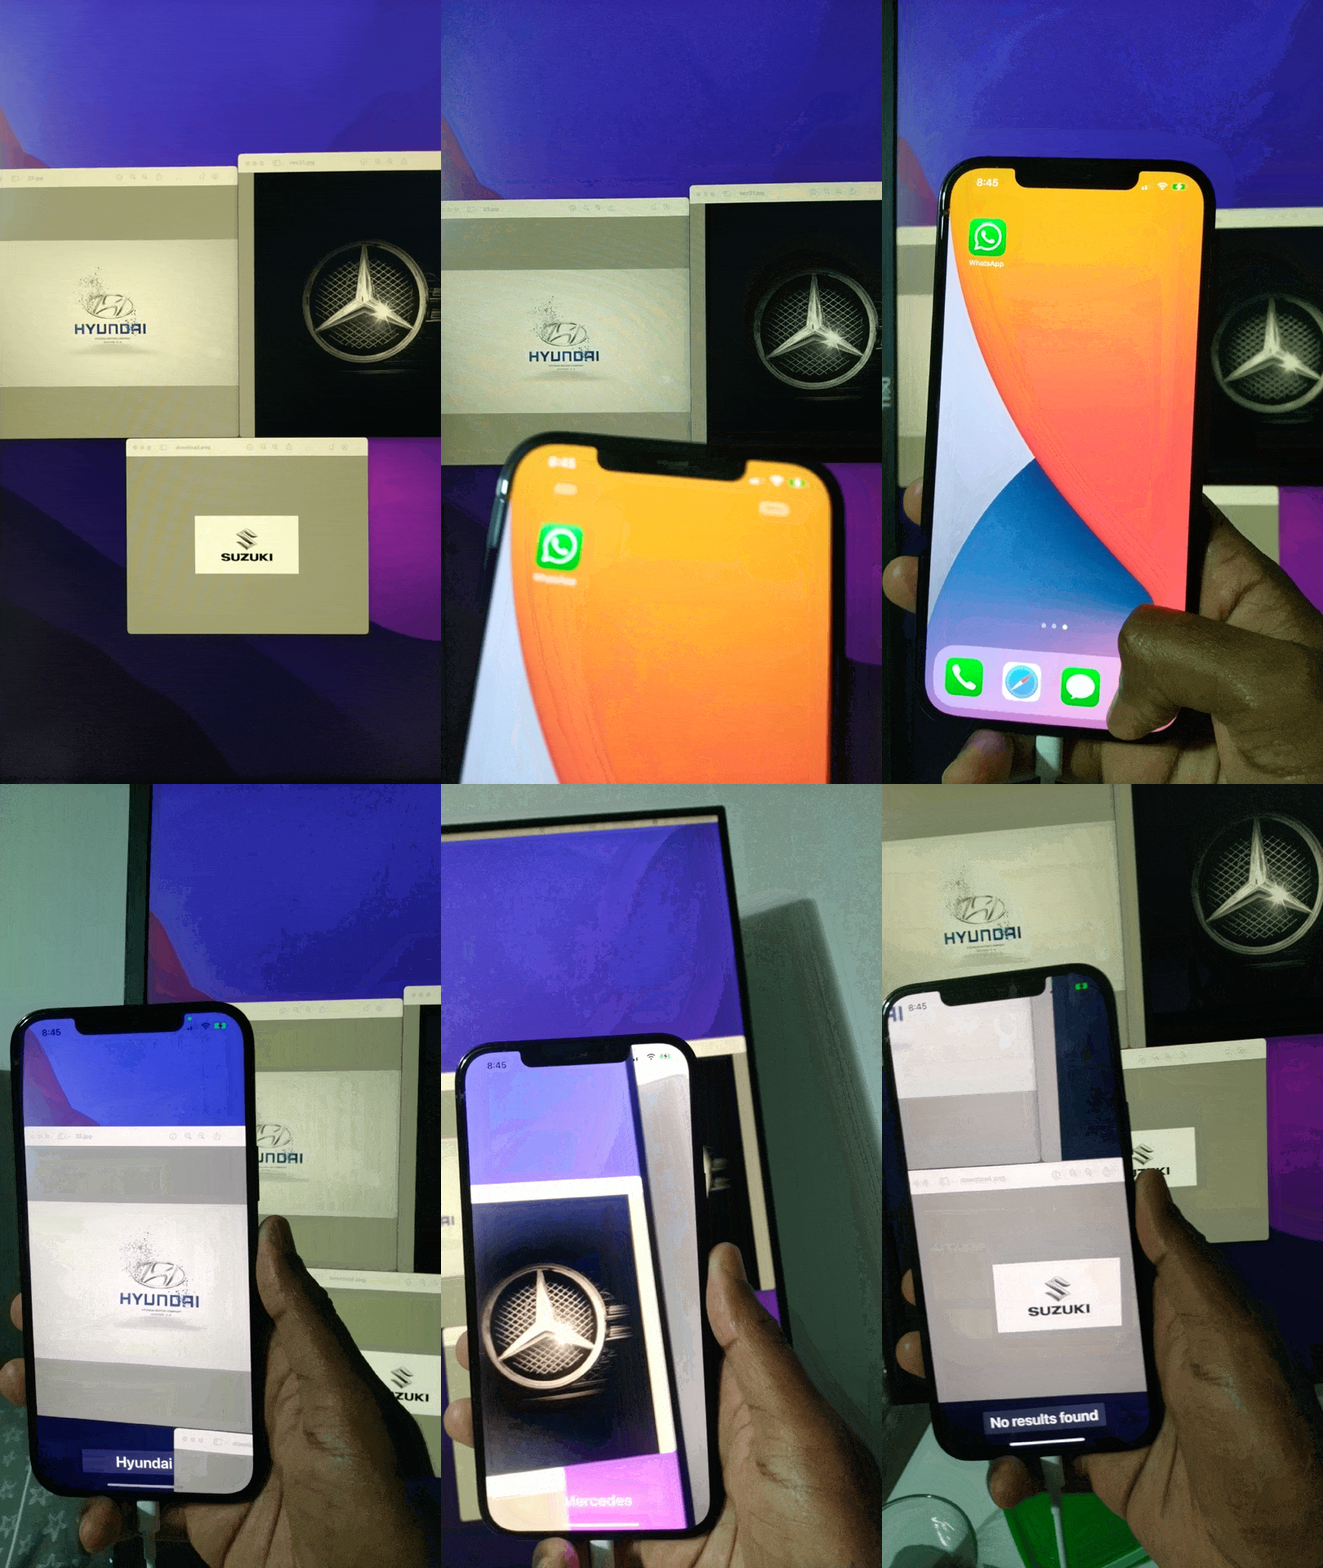
- let us run our app and see how it works
Some points to remember:
.mlmodel cannot be updated dynamically inside the user's device once the app is installed, if we need to use a new model, then we have to replace the existing one.
.mlmodel can be used with the On-Demand Resources so that it can be updated anyone in the air
User’s privacy is highly maintained inside this scanning, recognizing process because it happens inside the user’s device, NO APIs, no data collection from 3rd party,
Speed of processing results is topnotch in iOS devices and the size of created MLModels are very less than other alternatives of CreateML
This is a free third party commenting service we are using for you, which needs you to sign in to post a comment, but the good bit is you can stay anonymous while commenting.

