Why I write Snapshot tests?
Let us discuss writing snapshot testing in this article:
Testing is an integral part of any high quality software. I believe each company or software publisher verifies quality of product before shipping into market. It is said that if quality is good, it will attract more users. This fact applies to software development too.
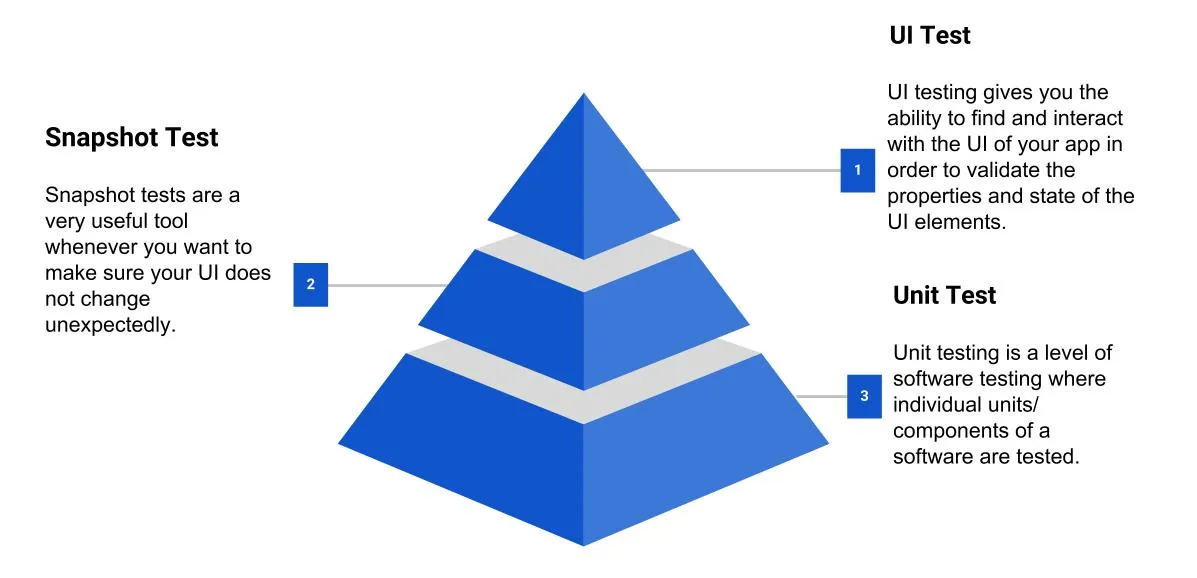
We perform UI testing either in manual or automation way to confirm app is behaving correctly and has all features according to specifications.
If we go more granular Unit testing comes in which we test individual units. We cover all edge cases by writing both positive i.e. tests passing correctly and negative tests i.e. to test how unit behaves when unexpected data comes.
It’s not really possible to write an automated test to capture UI “correctness”. The reason testing UIs is hard is that the salient details of the smallest modules of UI are hard to express programmatically. Correctness can’t be determined by textual part of the output.
We want our QA to focus on the exact components in the exact state that require human attention or feature which can be perfectly tested by automation.
But what about UI Unit Testing?

Well, We have a solution for this: Snapshot Testing!!

What is Snapshot Testing?
It’s a snapshot test system that renders UI components, takes a screenshot and subsequently compares a recorded screenshot with changes made by an engineer. If the screenshots don’t match there are two possibilities: either the change is unexpected or the screenshot can be updated to the new version of the UI component.
How to implement Snapshot testing in iOS?
There is a library called FBSnapshotTestCase created and maintained by facebook. Facebook deprecated this library and now Uber is maintaining this. This library has been renamed to iOSSnapshotTestCase now.
Work Flow of Snapshot Testing:
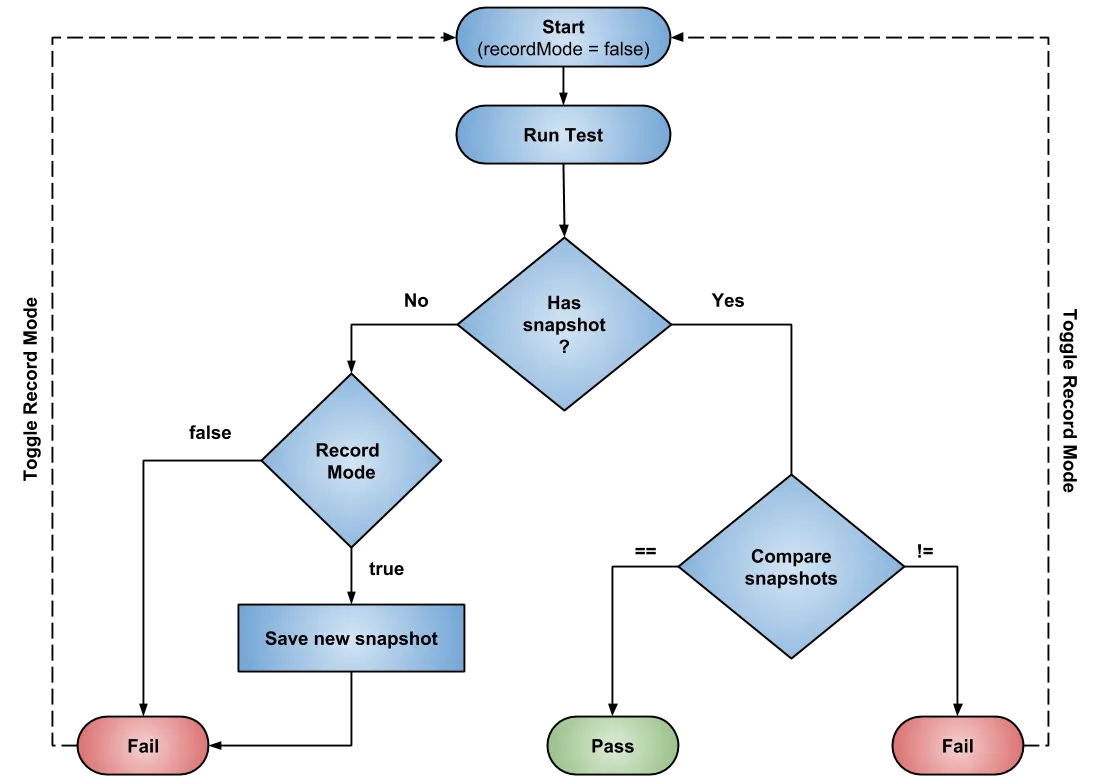
How iOSSnapshotTestCase captures snapshot?
iOSSnapshotTestCase provides FBSnapshotVerifyView(view) method to compare expectation with reference snapshot. If no reference snapshot exist, it captures. This method uses renderInContext() to capture snapshot but renderInContext() has some limitations, you can’t test Visual elements or UIAppearance with this. To test this elements there is another method drawViewHierarchyInRect. To use this method you need to set useDrawViewHierarchyInRect = true in your test.
Performance of drawViewHierarchyInRect is not good so I would suggest to use useDrawViewHierarchyInRect = true this only when you really need.
How iOSSnapshotTestCase compares snapshot?
There are many ways to compare image. First answer I got in my talk was compare image pixel by pixel which is correct but we need to think other aspects also before starting comparison pixel by pixel.
Let’s see how it does comparison:
- First it compares image sizes. If not matches, test failed.
- If tolerance rate is zero then it compares images on memory level using C function
Memcmp(). For this it allocates space in memory usingcalloc()and draw image in memory usingCGContextRef. - If tolerance rate is > 0 i.e. you are okay even if there is x% difference then it compares image pixel by pixel by iterating over numberOfPixels which is image width*height.
Features of iOSSnapshotTestCase:
- It automatically names reference images on disk according to test class and selector.
- You need to supply an optional “identifier” if you want to perform multiple snapshots in a single test method.
- Use
isDeviceAgnostic. If you set this property to true in test it will append device model, OS number & size in test name.
Pros:
- Snapshot tests are Easy to write. You don’t need to worry when you perform refactoring as if there is only code refactoring then tests shouldn’t fail.
- Decoupling: Views will be loosely coupled.
- Easy to verify layout on different sizes. I would suggest to take one simulator i.e. iPhone 6 as base to capture snapshot. If you take iPhone 8 which is 3x snapshot, size will be large. If you are using CI/CD tool make sure you set default simulator iPhone 6 there too.
- Increase code coverage: Many people don’t write UI unit tests, once you start writing it will enhance your code coverage report.
- Better PR description: You can start development from View to ViewController as both are loosely coupled. If you have created only View as of now then also you can open PR as reviewers can visualize view in captured snapshot.
Cons:
- Each snapshot takes approx 4 to 100 KB for use which consumes lot of repository space.
- Change in one component will result re-recording of all snapshot tests. Suppose earlier you was using UILabel in your all view. Later you changed UILabel into UITextView which can fail test because rendering of both component will be different.
- Some components are hard to test like animation, ads.
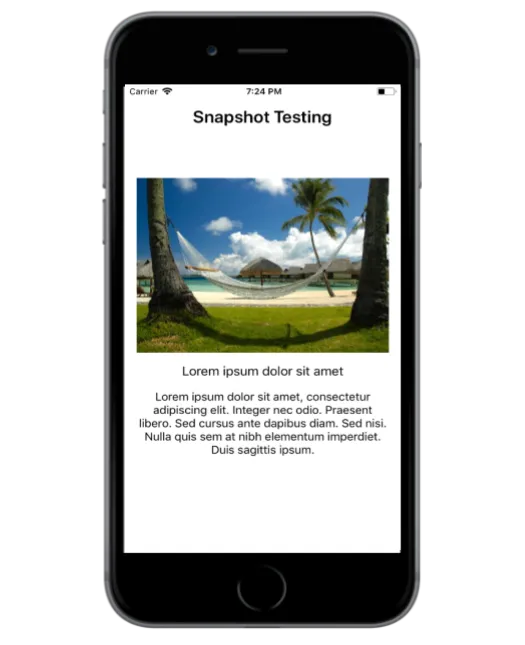
I have created ViewController and BeachView in main target of app.
    import Foundation

    import UIKit
    class BeachView: UIView {

        let name = UILabel()

        let details = UILabel()

        let imageView = UIImageView()

        override init(frame: CGRect) {

            super.init(frame: frame)

            setup()

        }

        required init?(coder aDecoder: NSCoder) {

            fatalError("Problem while creating view")

        }

        private func setup() {

            translatesAutoresizingMaskIntoConstraints = false

            addViewsToParent(imageView, name, details)

            setupStyleAttributes()

            setupConstraints()

        }

        private func setupStyleAttributes() {

            details.numberOfLines = 0

            name.addAttributes(with: .black, fontSize: 18)

            details.addAttributes(with: .black, fontSize: 16)

        }

        private func setupConstraints() {

            imageView.translatesAutoresizingMaskIntoConstraints = false

            imageView.topAnchor.constraint(equalTo: topAnchor).isActive = true

            imageView.leadingAnchor.constraint(equalTo: leadingAnchor).isActive = true

            imageView.trailingAnchor.constraint(equalTo: trailingAnchor).isActive = true

            imageView.heightAnchor.constraint(equalToConstant: 250).isActive = true

            name.translatesAutoresizingMaskIntoConstraints = false

            name.topAnchor.constraint(equalTo: imageView.bottomAnchor, constant: 16).isActive = true

            name.leadingAnchor.constraint(equalTo: leadingAnchor).isActive = true

            name.trailingAnchor.constraint(equalTo: trailingAnchor).isActive = true

            details.translatesAutoresizingMaskIntoConstraints = false

            details.topAnchor.constraint(equalTo: name.bottomAnchor, constant: 16).isActive = true

            details.leadingAnchor.constraint(equalTo: leadingAnchor).isActive = true

            details.trailingAnchor.constraint(equalTo: trailingAnchor).isActive = true

            details.bottomAnchor.constraint(equalTo: bottomAnchor).isActive = true

        }

        func update(with beach: Beach) {

            update(with: beach.imageURL)

            name.text = beach.name

            details.text = beach.details

        }

        private func update(with url: URL) {

            do {

                let data = try Data(contentsOf: url)

                imageView.image = UIImage(data: data)

            } catch {

                preconditionFailure("\(error)")

            }

        }

    }


    extension UIView {

        func addViewsToParent(_ views: UIView...) {

            views.forEach { view in

                addSubview(view)

            }

        }

    }

    extension UILabel {

        func addAttributes(with color: UIColor, fontSize: CGFloat) {

            textColor = color

            font = UIFont.systemFont(ofSize: fontSize)

            textAlignment = .center

        }

    }
This is how app looks in simulator:
Let’s do setup in app to perform snapshot testing:
For snapshot testing, I created new target in app i.e. SnapshotTests.
File -> New Target -> iOS Unit Testing Bundle.
- Add pod
iOSSnapshotTestCasein podfile. - Add below environment variables into main target scheme:

Note: IMAGE_DIFF_DIR is optional. You can keep it at local but don’t push this into repository. IMAGE_DIFF_DIR will have 3 images i.e. reference image, failed image and diff image of one test which can end up in consuming lot of space in repository. So it doesn’t make sense to push this environment variable into repository.
Requirement for writing Snapshot Test:
For writing a test you will need view and data. Suppose in your production code you have this method: update(with: model). Most probably in production code you will be getting data from API or database. Now for writing tests you need to inject data.
As you see above we have a simulator screenshot. From this design I want to write one test for beach view and another one for viewController view.
I created one base class to configure snapshot test options:
Now I will write snapshot test for BeachView i.e. BeachViewSnapshotTests
    import XCTest

    @testable import SnapshotTesting


    class BeachViewSnapshotTests: AJSnapshotTestCase {

        let origin = CGPoint(x: 0, y: 0)

        override var recordingMode: Bool {

            return false

        }

        func testIsShowingCorrectlyOniPhone6Devices() {

            makeSnapshot(for: CGRect(origin: origin, size: Device.iPhone6.size()))

        }

        func testIsShowingCorrectlyOn6Devices_WithDifferentName() {

            let frame = CGRect(origin: origin, size: Device.iPhone6.size())

            let testData = Beach.testDataFromBundle(name: "Aaina")

            makeSnapshot(for: frame, with: testData)

        }

        private func makeSnapshot(for frame: CGRect, with testData: Beach = Beach.testDataFromBundle()) {

            let containerView = UIView()

            containerView.frame = frame

            let view = BeachView()

            containerView.addSubview(view)

            containerView.backgroundColor = .white

            view.translatesAutoresizingMaskIntoConstraints = false

            view.leadingAnchor.constraint(equalTo: containerView.leadingAnchor, constant: 50).isActive = true

            view.trailingAnchor.constraint(equalTo: containerView.trailingAnchor, constant: -50).isActive = true

            view.centerYAnchor.constraint(equalTo: containerView.centerYAnchor).isActive = true

            view.update(with: testData)

            verify(view: containerView)

        }

    }
When you run this test testIsShowingCorrectlyOniPhone6Devices it will fail. You need to set recordMode to true to save snapshot on device. Still test will fail as snapshot was not there earlier. Toggle recordMode and run test, this time comparison will be done and test will pass.
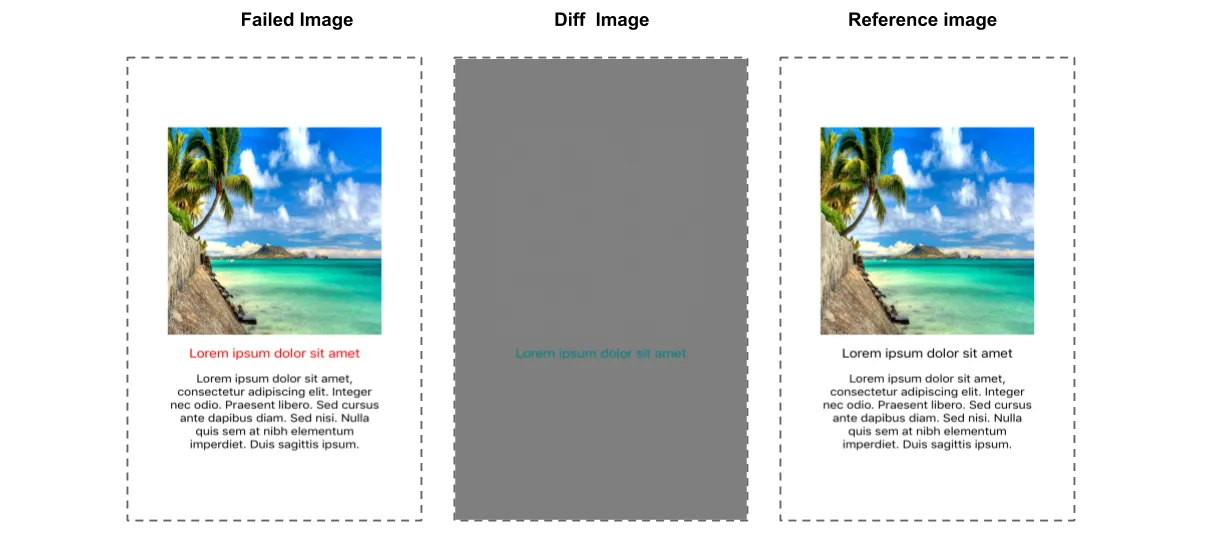
Now I will do some refactoring. I want to modify name of injected data. If you notice I have created beautiful test data for it that I can reuse anywhere I want. I had other options also to inject data into view by creating local JSON or dummy data. But both are not good for any architecture you will end up with having lot of duplicacy.

After injecting modified data when I run tests they fail and I can see failure difference in Failure_Diff directory.
Things to keep in mind if you are integrating Snapshot Testing:
- Architecture: You can capture snapshot of ViewController but it will be difficult for you to identify actual test failing reason. I would suggest to create small views which you can perfectly test and reuse too.
- Asynchronicity: You can’t perform asynchronous operations while executing snapshot tests as timeout will occur. If you are loading images from web server asynchronously there are chances images won’t be visible in snapshot tests. For that you can load image from bundle and you can model from this URL. You can check my
Beach+TestData.swiftin Sample code.
Where to find failed and captured snapshots?
- Snapshots can be easily find in specified directory.
- Quick way to see difference between failed and referenced image is source tree.
References:
Efficient Test Data Creation in Swift Test Driven Development: By Example 1st Edition by Kent Beck
Conclusion:
I found this a good way for writing UI unit tests. It helps a lot when you work in large team. I would suggest you to also follow the same. Before integrating this into your project you can do POC on this. I have attached my sample code link in References. I have created view here programmatically. You can load view by xib or storyboard too to perform snapshot testing.
The entire project can be found here
Thanks for reading 🚀
If you have questions/suggestion, please add a comment below 👁️🗨️
If you liked this article, please share it with your friends and fellow Developers 🙏


This is a free third party commenting service we are using for you, which needs you to sign in to post a comment, but the good bit is you can stay anonymous while commenting.