Traits, Suites & Concurrency: Unlocking Swift Testing’s Full Potential
Unlock Swift Testing
Traits
Traits are a way to customize the behavior of individual test cases and adds descriptive information to tests
You can use traits to:
Disable a test temporarily
Skip tests under specific conditions
Group or tag tests
Control test execution behavior (e.g., timeouts, retries in future updates)
They make your tests more expressive, flexible, and self-documenting.
Conditional Trait
.disabled
This helps you skip a test while keeping it in your codebase.
@Test(.disabled("This feature is under development"))
func featureUnderDevelopment() {
    // This code will never run - the test will be skipped
    #expect(false) // Would fail if it ran, but it won't
}
.disabled Trait example
From Apple Documentation
static func disabled(
    if condition: @autoclosure @escaping () throws -> Bool,
    _ comment: Comment? = nil,
    sourceLocation: SourceLocation = #_sourceLocation
) -> Self
.disabled Trait Apple Documentation
Here’s how it looks in practice:
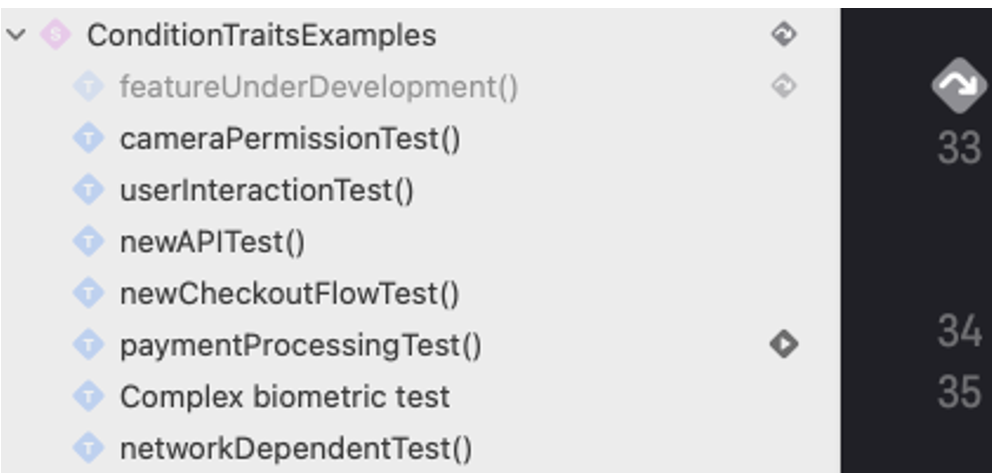
.disabled Trait - Test Navigator
featureUnderDevelopment() is greyed out and skipped
Other tests like cameraPermissionTest() and paymentProcessingTest() are still active
.enabled
Sometimes you only want a test to run under specific conditions—like on a real device. That’s where the .enabled trait comes in handy.
// Test that only runs on real devices
@Test(.enabled(if: isPhysicalDevice(), "Camera access only available on physical devices"))
func cameraPermissionTest() {
    // This test will only run on physical devices, not in    simulators
    // Test camera permission logic here
    #expect(true)
}
.enabled Trait Example
With .enabled, the test is skipped unless the condition is met. Perfect for tests that rely on hardware features like camera, biometrics, or sensors.
From Apple Documentation
static func enabled(
    if condition: @autoclosure @escaping () throws -> Bool,
    _ comment: Comment? = nil,
    sourceLocation: SourceLocation = #_sourceLocation
) -> Self
.enabled Trait
TimeLimitTrait
In traditional XCTest, managing timeouts requires expectations and manual waits:
class LocalProcessingTimeoutXCTest: XCTestCase {
    func testDataProcessingTimeout() {
        let expectation = XCTestExpectation(
		description: "Data processing completed”
	)
        let processor = DataProcessor()
        Task {
            do {
                let result = try await processor.processDataset()
                XCTAssertTrue(result.count > 0)
                expectation.fulfill()
            } catch {
                XCTFail("Processing failed")
            }
        }
        wait(for: [expectation], timeout: 0.1)
    }
}
XCTest - TimeLimit
In Swift Testing Framework,
struct LocalProcessingSwiftTesting {
    @Test(.timeLimit(.minutes(1)))
    func testDataProcessing() async throws {
        let processor = DataProcessor()
        let result = try await processor.processDataset()
        #expect(result.count > 0, "Should find some prime numbers")
    }
}
Swift Testing - .timeLimit Trait
💡
Note: timeLimit only accepts durations of 1 minute or more—no sub-minute precision like 500ms.
This is intentional to keep the framework lightweight and avoid unnecessary complexity.
Tag.List
A type representing one or more tags applied to a test.
Swift Testing introduces a powerful way to categorize and filter tests using the @Tag attribute. Tags allow you to group tests based on type, feature, or behavior—for better readability and easier execution.
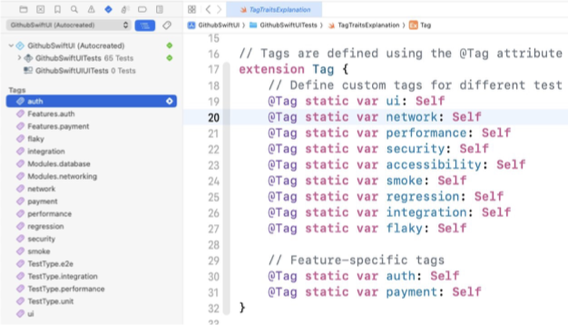
Tag Extension
These are type-safe, compiler-checked, and easy to manage.
Tagging Individual Tests
Once defined, you can apply tags using the .tags trait:
struct TaggingIndividualTests {

    @Test(.tags(.ui))
    func testUIComponents() { … }


    @Test(.tags(.network, .performance))
    func testNetworkPerformance() { … }


    @Test(.tags(.flaky), .timeLimit(.minutes(1)))
    func testFlakyWithTimeLimit() { … }

}
tags Trait Example
Multiple tags can be applied to a single test
You can combine tags with other traits like .timeLimit
Tags help isolate and run targeted groups of tests quickly
Why Use Tags?
Tags give you the flexibility to:
Group regression or flaky tests
Isolate module-specific tests like auth, payment, networking
Create fast-feedback suites by tagging critical paths
Improve test navigation in large projects
And the best part? Once you’ve added tags, they appear in Xcode’s Test Navigator, letting you run them independently.
Bug
A type representing a bug report tracked by a test.
One of the standout features in the new Swift Testing framework is the ability to link tests to bug reports—something that was missing in traditional XCTest.
// Real bug that cost us $50k in lost revenue last quarter when customers
// with apostrophes in their names couldn't complete transactions
@Test(.bug("https://github.com/myorg/myrepo/issues/789"))
func testNameWithSpecialCharacters() {
    let processor = PaymentProcessor()
    let payment = Payment(customerName: "M'Kathir", amount: 99.99)
    let result = processor.processPayment(payment)
    #expect(result.succeeded)
}
Bug Example
With just .bug("url"), you can associate your test with a real issue.
You can link to GitHub, JIRA, or any issue tracker.
Syntax
static func bug(
    _ url: String,
    _ title: Comment? = nil
) -> Bug
Bug - Apple Documentation
Why Is This Useful?
Traceability - Directly connect bugs to tests for future reference.
Documentation - Capture business-impacting issues right in the test itself.
Release Notes - Make automated changelogs more powerful by referencing linked bugs.
Team Awareness - New team members or reviewers immediately understand why a test exists.
Custom Traits
@Test(.offline)
func offlineCachingTest() async throws {
    // No need to manually set up offline mode - the trait handles it!
    let apiClient = NetworkClient.shared
    let result = await apiClient.fetchData()
    #expect(result.source == .cache)
}
Custom Trait
In this example:
I created a custom .offline trait that stubs network status as offline, so the entire test runs in that condition — no manual setup required!
Curious how to make your own traits?
Yes, it’s possible! You’re not limited to built-in ones like .tags or .timeLimit.
Real-World Use Cases for Custom Traits
You can go beyond just offline/online stubbing — here are common categories for creating custom traits:
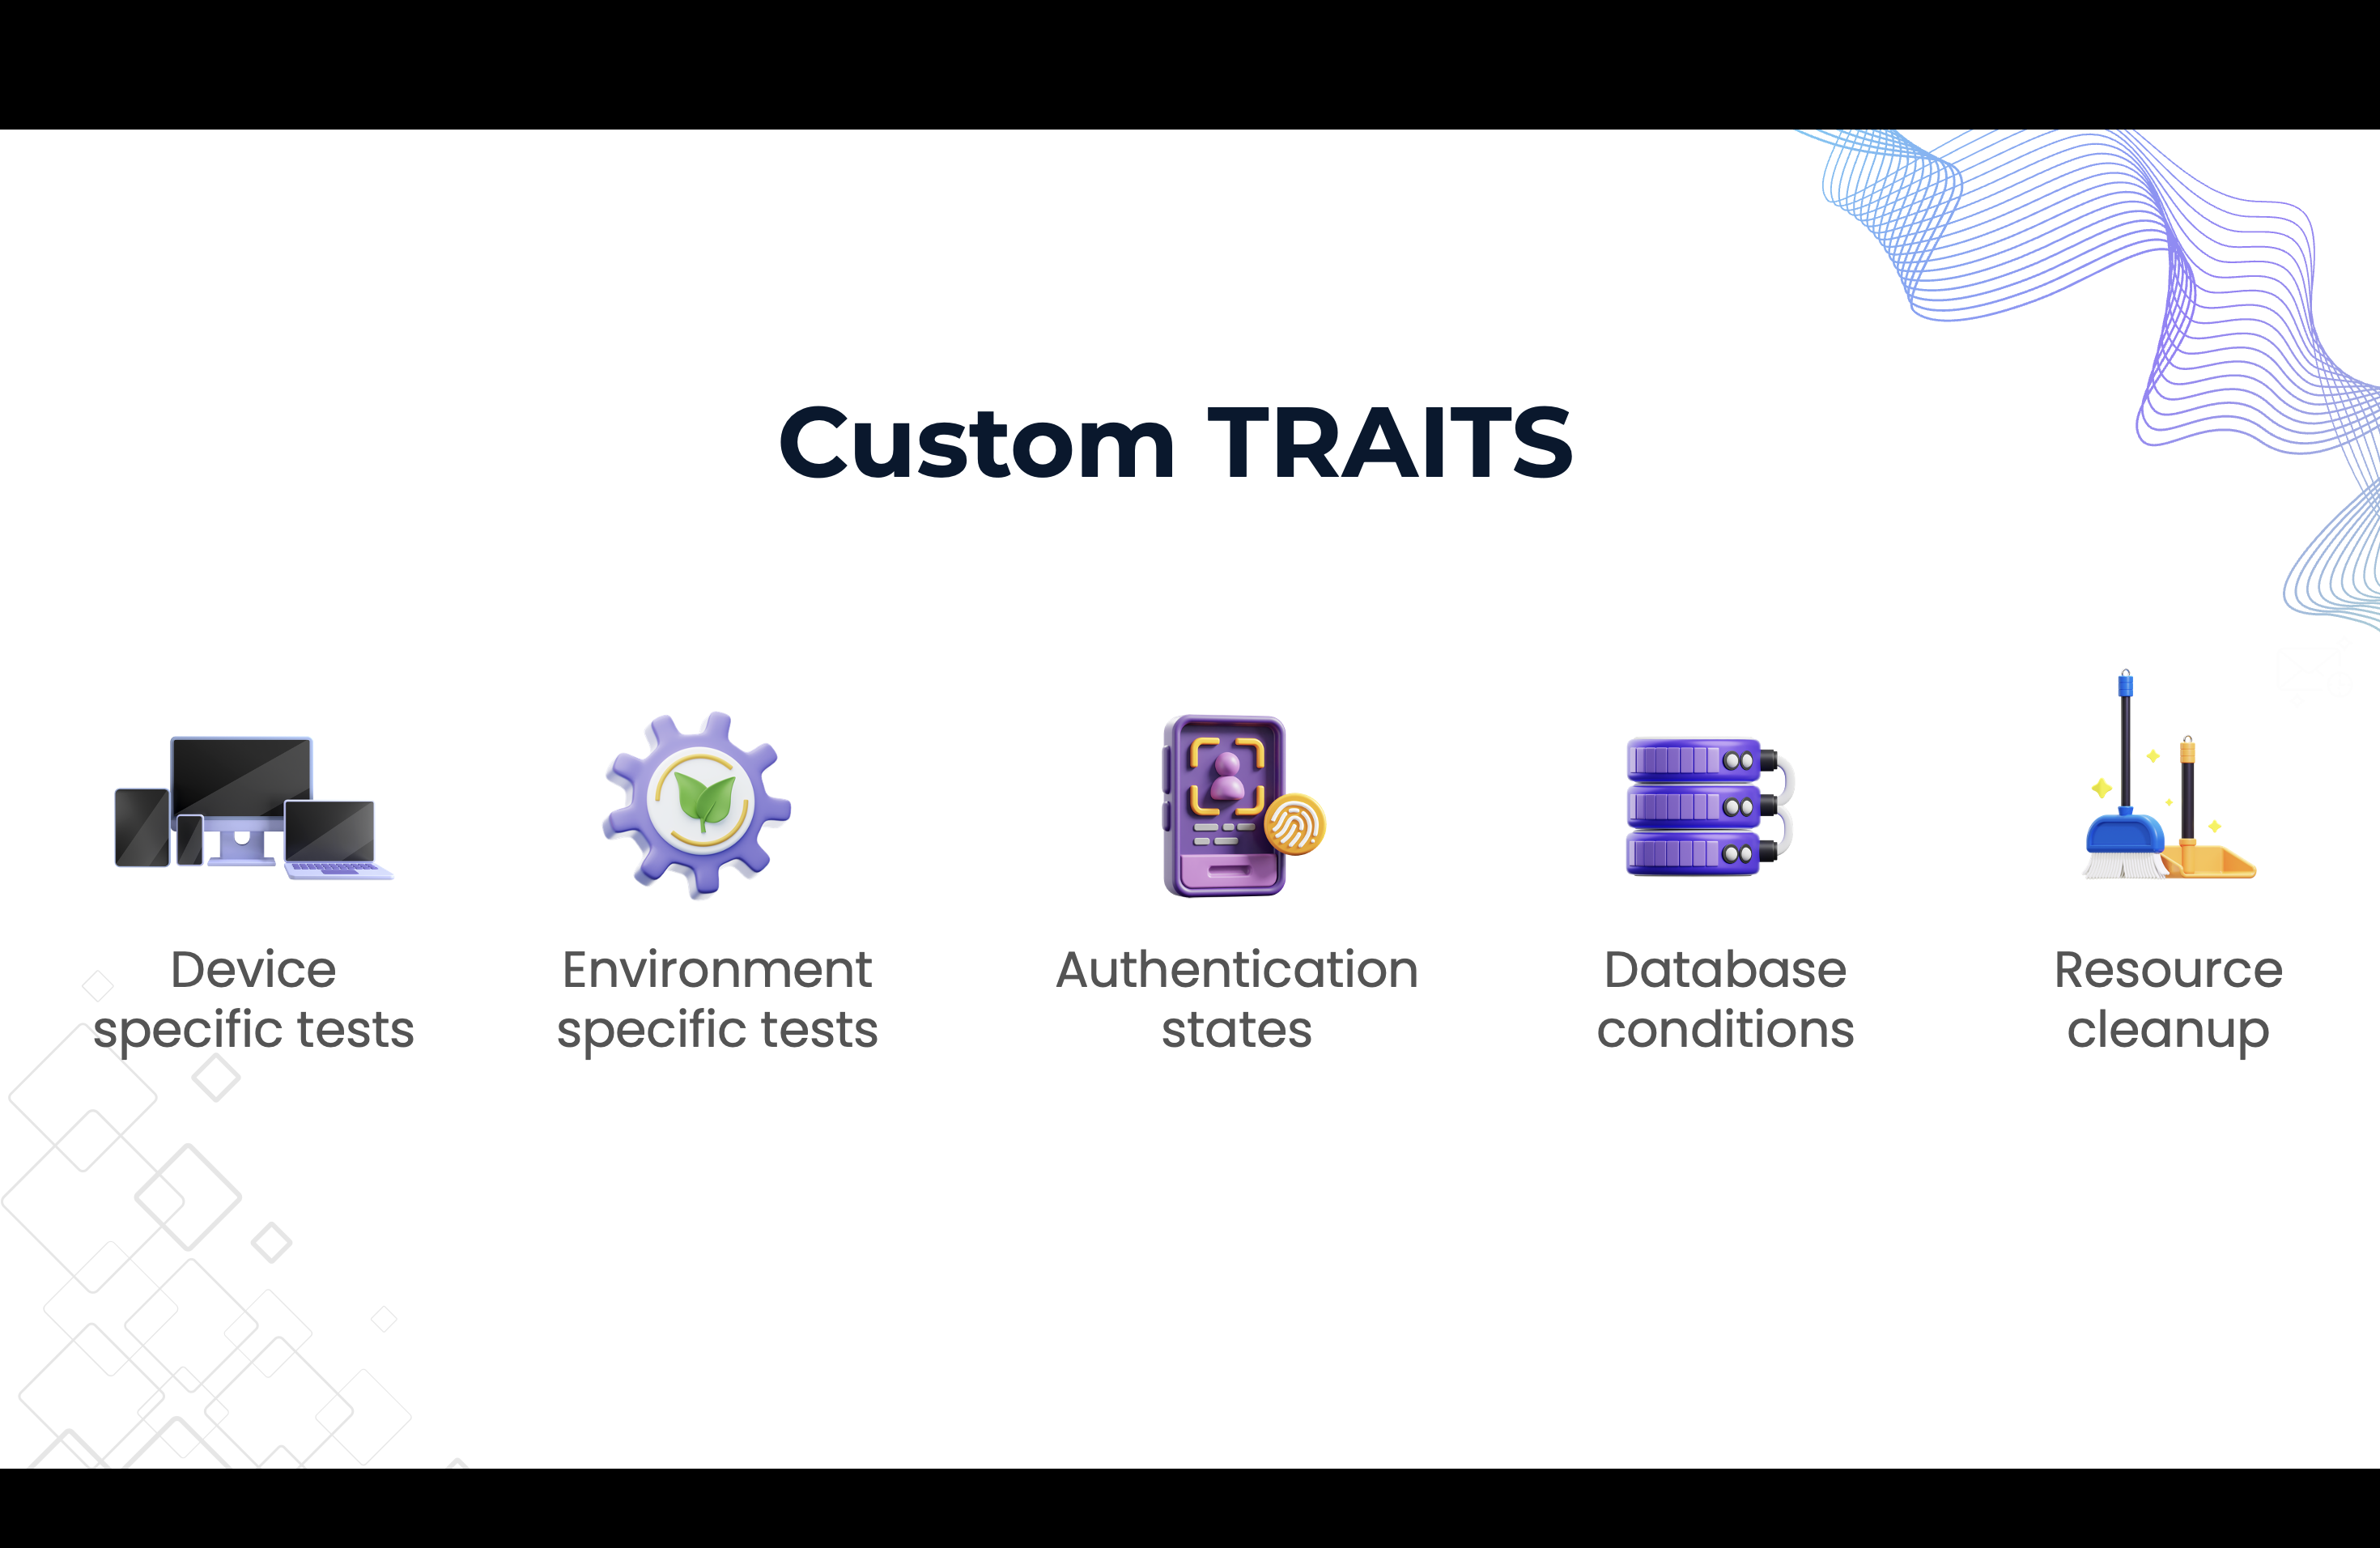
Custom Traits Use Cases
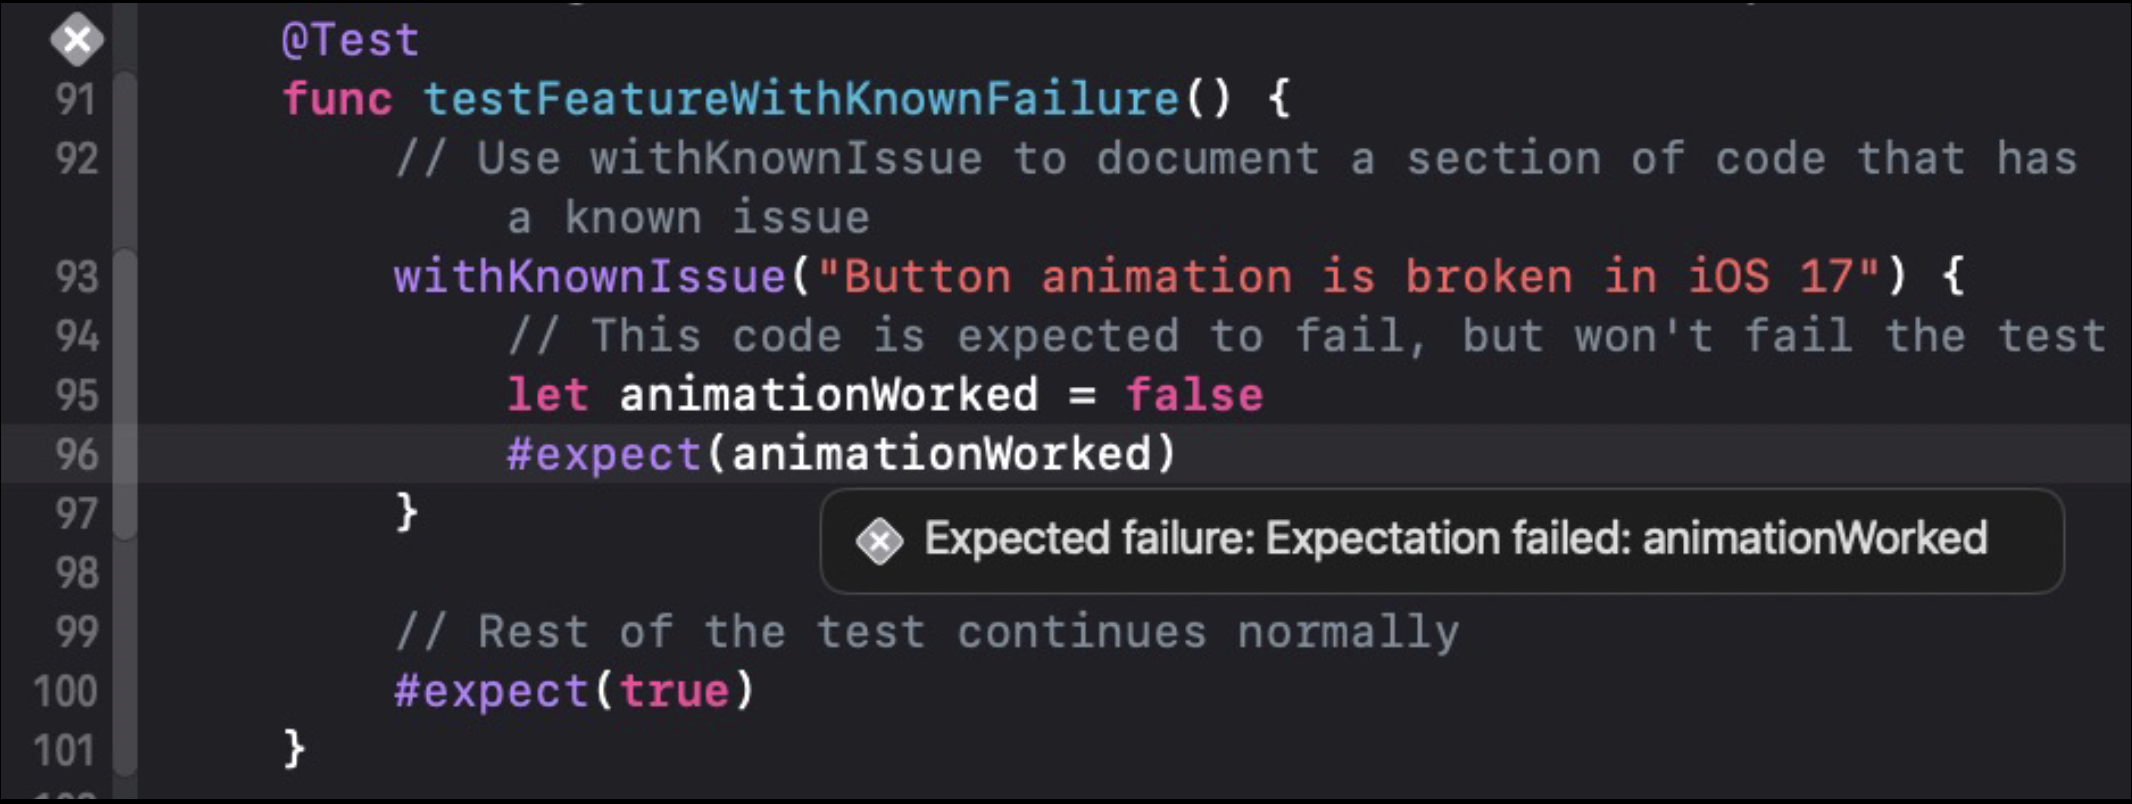
withKnownIssue()
Let’s say you have a bug that occurs only on iPhones — for example, the keyboard hides a comment input field. The same code works fine on iPads.
Instead of disabling the test or modifying your main logic, Swift Testing allows you to mark the failure as expected only under that specific condition:
@Test
func testCommentInputFieldVisibility() {
    let isIPhone = UIDevice.current.userInterfaceIdiom == .phone
    withKnownIssue("Comment field gets hidden by keyboard on iPhone only") {
        let commentView = CommentInputView()
        commentView.activateKeyboard()
        #expect(commentView.isFullyVisible)
    } when: {
        isIPhone
    }
    #expect(commentView.canAcceptInput)
}
withKnownIssue() Example
How It Works
The withKnownIssue() function wraps the failing code block.
The when: condition checks if the failure scenario applies — in this case, if the device is an iPhone.
On iPhones, the framework treats the failure as expected.
On other devices (e.g., iPads), the test runs and fails normally if something breaks.
Why It’s Useful
Avoids commenting out or disabling tests.
Keeps tests active and visible.
Known failures show a grayed-out icon.
Helps isolate issues without affecting unrelated tests.
When to Use It
Device-specific bugs (e.g., iPhone-only UI issues)
OS-specific failures (like iOS 17 behavior changes)
Platform limitations or temporary regressions
withKnownFailure Example
Parameterization
In XCTest, testing logic against multiple inputs can get messy. You’re either forced to:
Create separate test methods for each input
Or use a for-loop in one method — which gives you no visibility into which case failed
class EmailValidatorXCTests: XCTestCase {
    func test_ValidEmail_With_SimpleDomain() {
        XCTAssertTrue(EmailValidator.isValid("user@example.com"))
    }

    func test_ValidEmail_With_Subdomain() {
        XCTAssertTrue(EmailValidator.isValid("user@sub.example.com"))
    }

    func test_InvalidEmail_MissingAt() {
        XCTAssertFalse(EmailValidator.isValid("userexample.com"))
    }

    func test_InvalidEmail_MissingUsername() {
        XCTAssertFalse(EmailValidator.isValid("@example.com"))
    }
}
Parameterization Example
If one case fails, you don’t know which one — unless you read through the error message.
XCTest
func testMultipleEmails() {
    let testCases: [(email: String, isValid: Bool)] = [
        ("user@example.com", true),
        ("user@sub.example.com", true),
        ("userexample.com", false),
        ("@example.com", false),
        ("user@", false),
        ("user@examplecom", false)
    ]
    for testCase in testCases {
        XCTAssertEqual(
            EmailValidator.isValid(testCase.email),
            testCase.isValid,
            "Email validation failed for: \(testCase.email)"
        )
    }
}
Parameterization in XCTest
Swift Testing
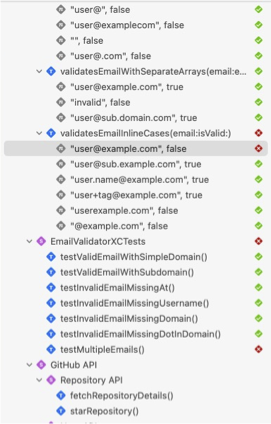
With Swift Testing, you can pass test cases directly to your test function using the arguments: trait:
@Test(arguments: [
    ("user@example.com", true),
    ("user@sub.example.com", true),
    ("user+tag@example.com", true),
    ("userexample.com", false),
    ("@example.com", false)
])
func validatesEmail(email: String, isValid: Bool) {
    #expect(
        EmailValidator.isValid(email) == isValid,
        "Email validation incorrect for: \(email)"
    )
}
Parameterization in Swift Testing
Why This Is Better
Each input is treated as a separate test case
You get granular pass/fail visibility in the Test Navigator
No need for loops or splitting logic into multiple functions
Failing cases are clearly identified — no guesswork
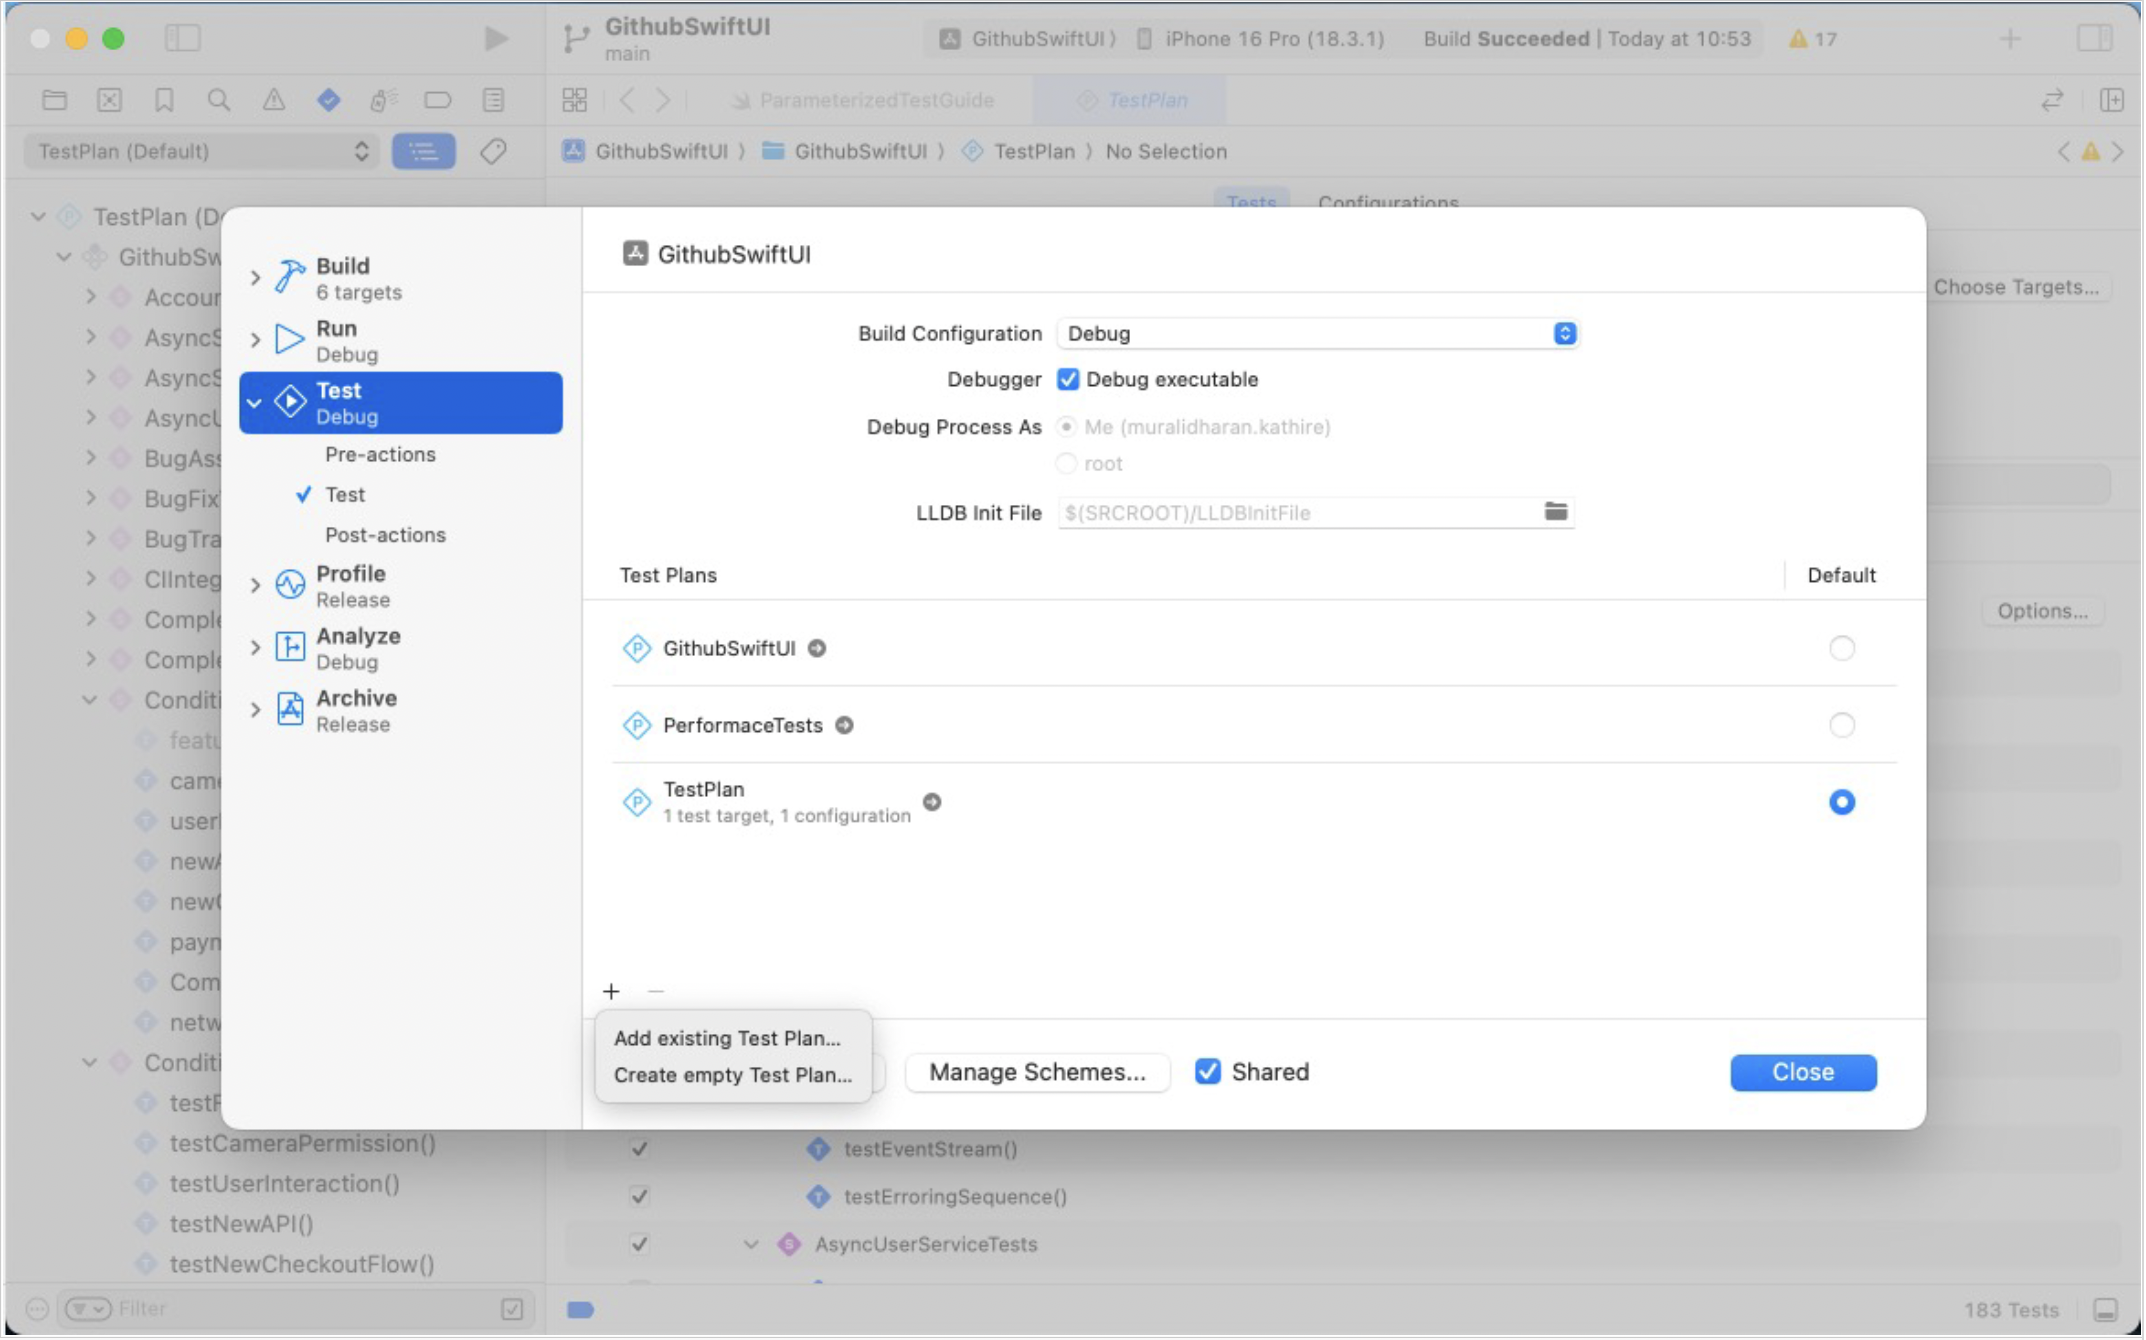
Test Navigator
Additional Notes
Supports up to two argument collections
You can also use zip() to test combinations
Helps eliminate boilerplate and improves debugging clarity
Suites
In Swift Testing, you’ve seen how individual tests use @Test, and traits like .tags or .bug can enhance them. The final piece in the testing puzzle is @Suite.
A Suite is a container for grouping related tests under a named type — like a struct, class, or actor. This helps organize your test hierarchy and adds meaningful structure to your test results.
Suites group related tests together, improving organization and clarity.
@Test functions and nested @Suites are automatically considered part of the suite.
Suites can have stored properties and lifecycle methods (init / deinit) for setup/teardown logic.
Each test method gets its own instance, isolating state safely.
💡
Embrace value semantics: Use structs to keep state management clean and isolated.
@Suite("User Authentication Tests")
struct AuthenticationTests {
    @Test func userCanSignIn() {
        let isSignedIn = true
        #expect(isSignedIn)
    }

    @Test func userCanSignOut() {
        let isSignedOut = true
        #expect(isSignedOut)
    }
}
Suite Example
Syntax Reference
So if you want to group all networking tests, login/logout tests, or feature-specific flows — wrap them inside a @Suite and keep your project clean and structured.
@attached(member) @attached(peer)
macro Suite(_ traits: any SuiteTrait...)
Suite Apple Documentation
Visually organize related tests together in the Test Navigator
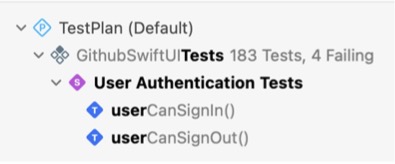
Test Navigator
TRAITS
PARALLELIZATION - Controlling Test Execution
Continuing with Traits - Building Block.
Let’s say you have a series of database tests:
struct DBTests {
    @Test
    func test1_beginTransaction() async throws { …  }
    @Test
    func test2_updateUser() async throws { … }
    @Test
    func test3_commitTransaction() async throws { … }
    @Test
    func test4_verifyUpdate() async throws { … }
}
Series of Database Tests
Each test depends on the one before it. If these run in parallel, they may:
Execute out of order
Fail due to shared resource conflicts
Leave your database in an inconsistent state
To ensure that tests run one at a time, you can now apply the .serialized trait:
@Suite(.serialized)
struct DBTests {
    @Test
    func test1_beginTransaction() async throws { …  }
    @Test
    func test2_updateUser() async throws { … }
    @Test
    func test3_commitTransaction() async throws { … }
    @Test
    func test4_verifyUpdate() async throws { … }
}
.serialized trait
This guarantees:
No race conditions
Correct test order
More reliable results in shared environments
XCTest vs Swift Testing
In XCTest:
You either ran everything in parallel, or
Had to disable parallelization globally
With Swift Testing:
You can mix parallel and serialized tests
It’s more flexible and improves runtime efficiency without compromising stability
Valid Usage Only
The .serialized trait only works:
At the suite level, or
With parameterized tests
Using it incorrectly results in a warning:
struct IncorrectUsageExample {
    @Test(.serialized)
    func thisTraitHasNoEffect() async {
        #expect(true)
    }
}
valid usage
Use Cases for
.serialized
Database operations
File I/O or system state tests
Tests relying on specific execution order
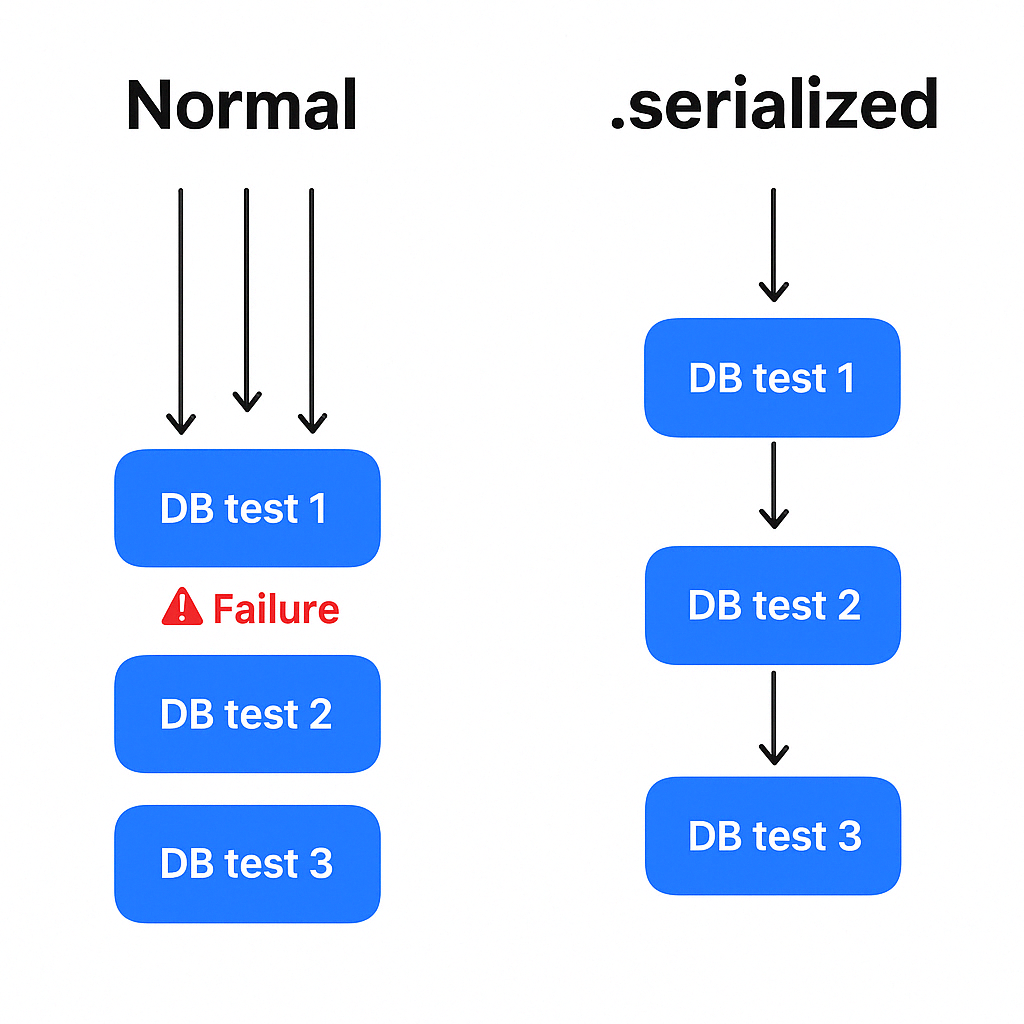
.serialized vs normal
TAG - Organizing and Filtering Test
@Suite(.tags(.integration))
struct IntegrationTestSuite {
    @Test
    func testIntegrationFeatureA() {
        #expect(true)
    }
    @Test
    func testIntegrationFeatureB() {
        #expect(true)
    }
    @Test(.tags(.security))
    func testSecureIntegration() {
        #expect(true)
    }
}
Organized and Filtering
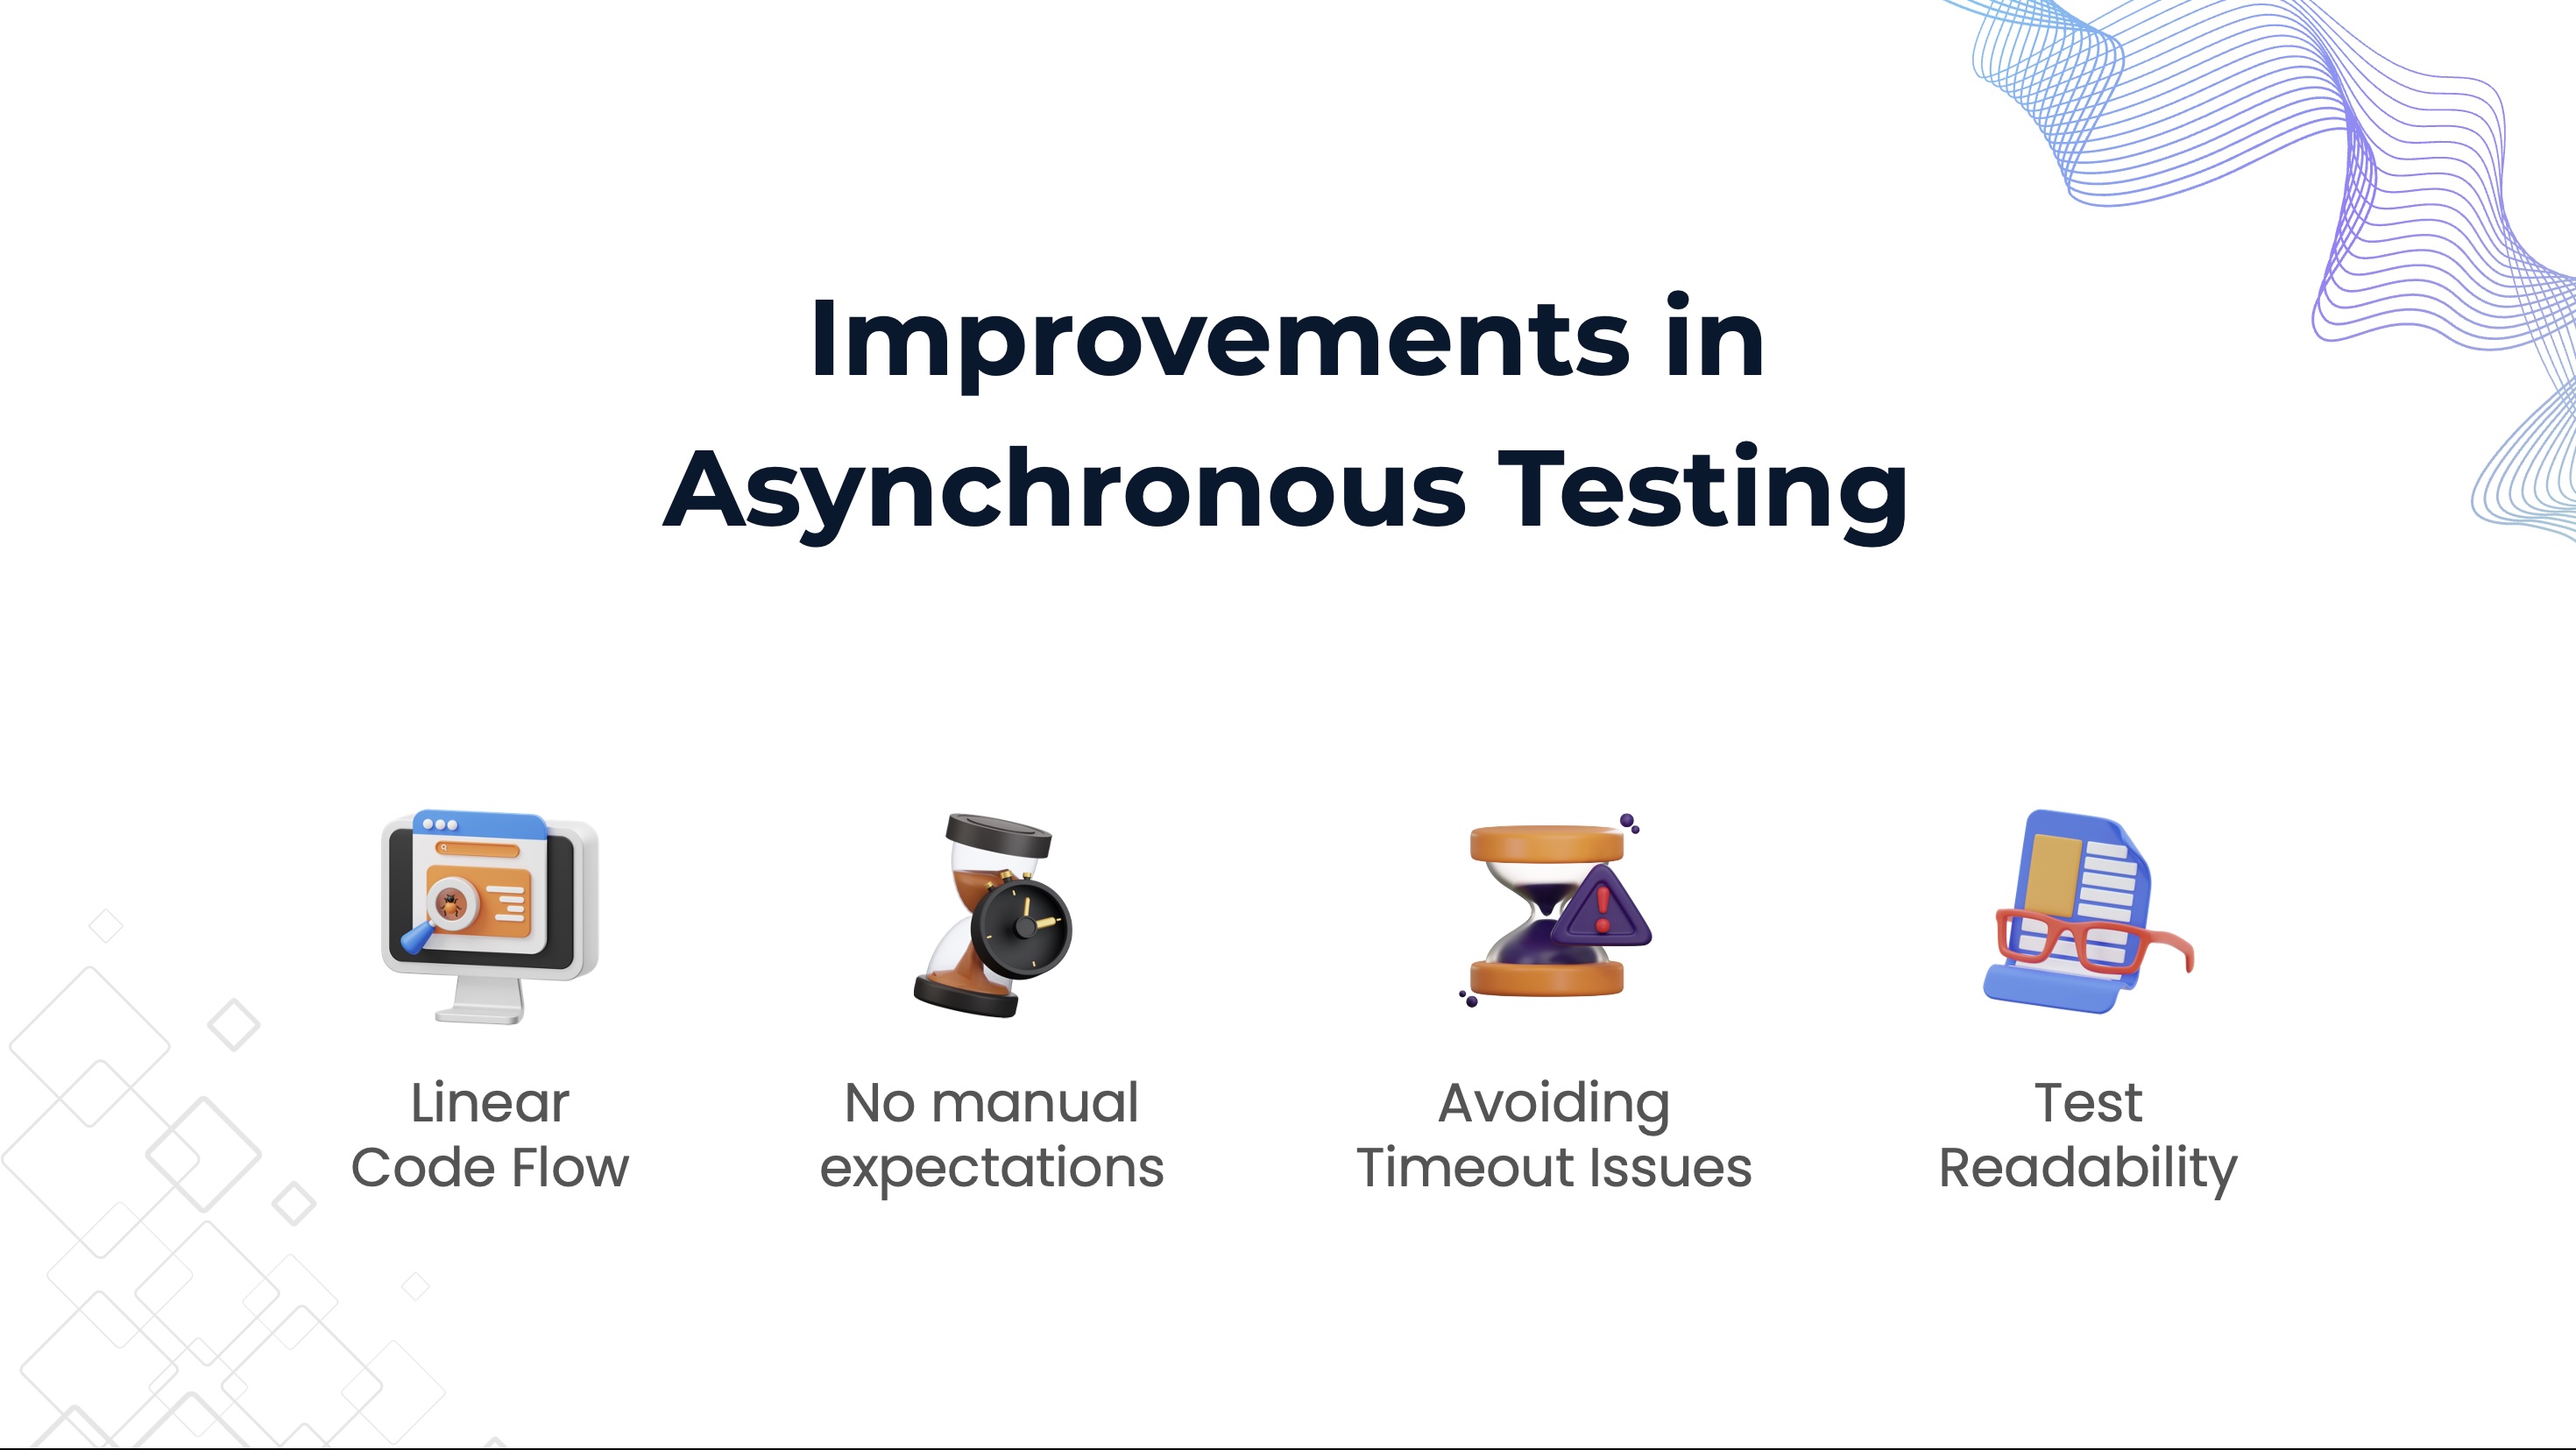
Asynchronous Testing
Async/Await
XCTest Framework
When testing asynchronous code that throws errors, XCTest requires a fair bit of boilerplate — do-catch blocks, manual expectations, and timeouts. Swift Testing simplifies all of this with a single macro.
func test_Fetch_UserName_Throws_For_InvalidId() {
    let expectation = self.expectation(description: "Fetch user name")

    Task {
        do {
            let userName = try await service.fetchUserName(id: -1)
            XCTFail("Expected error not thrown")
            expectation.fulfill()
        } catch let error {
            XCTAssertNotNil(error)
            expectation.fulfill()
        }
    }
    waitForExpectations(timeout: 1.0)
}
XCTest Example
Swift Testing
@Test func fetchUserNameThrowsForInvalidId() async {
        await #expect(throws: NSError.self) {
            _ = try await service.fetchUserName(id: -1)
        }
    }
Swift Testing Example
No do-catch needed
No manual XCTFail() or expectation.fulfill()
Reads exactly as the intent: “expect this to throw”
Swift Testing helps you write tests that are precise, clean, and purpose-driven, especially when dealing with concurrency and error handling.
Combine
XCTest Framework
func test_StockPrice_Stream() {
    let stockPublisher = StockPricePublisher()
    let expectation = self.expectation(description: "All prices received")
    var receivedPrices: [Double] = []

    stockPublisher.priceStream(for: "AAPL")
        .sink(
            receiveCompletion: { _ in
                expectation.fulfill()
            },
            receiveValue: { price in
                receivedPrices.append(price)
            }
        )
        .store(in: &cancellables)

    wait(for: [expectation], timeout: 1.0)
    XCTAssertEqual( receivedPrices, [180.5, 182.3, 185.7] )
}
XCTest Example
Swift Testing
@Test func stockPriceStream() async {
    let stockPublisher = StockPricePublisher()
    var receivedPrices: [Double] = []

    await withCheckedContinuation { continuation in
        stockPublisher.priceStream(for: "AAPL")
            .sink(
                receiveCompletion: { _ in
                    continuation.resume()
                },
                receiveValue: { price in
                    receivedPrices.append(price)
                }
            )
            .store(in: &cancellables)
    }
    #expect( receivedPrices == [180.5, 182.3, 185.7])
}
Swift Testing Example
No expectation(description:)
No need for timeouts
Test ends naturally when the stream completes
Assertion reads cleanly using #expect
Swift Testing and withCheckedContinuation make testing Combine publishers easier and safer, especially for one-off or terminal streams.
You can write async-compatible tests without falling back to XCTestExpectation.
SPONSOR

The Unique iOS Swift Conference in the UK
SwiftLeeds is a premier iOS conference taking place on October 7-8 this year. If you’re looking to stay updated on the latest trends in iOS development and connect with like-minded professionals, this event is a must-attend! Don’t miss out—book your tickets now!
Get your tickets!Improvements in Asynchronous Testing
Improvements
Tags & Test Plans
Test Plan
Swift Testing GitHub
Open Source - Official GitHub
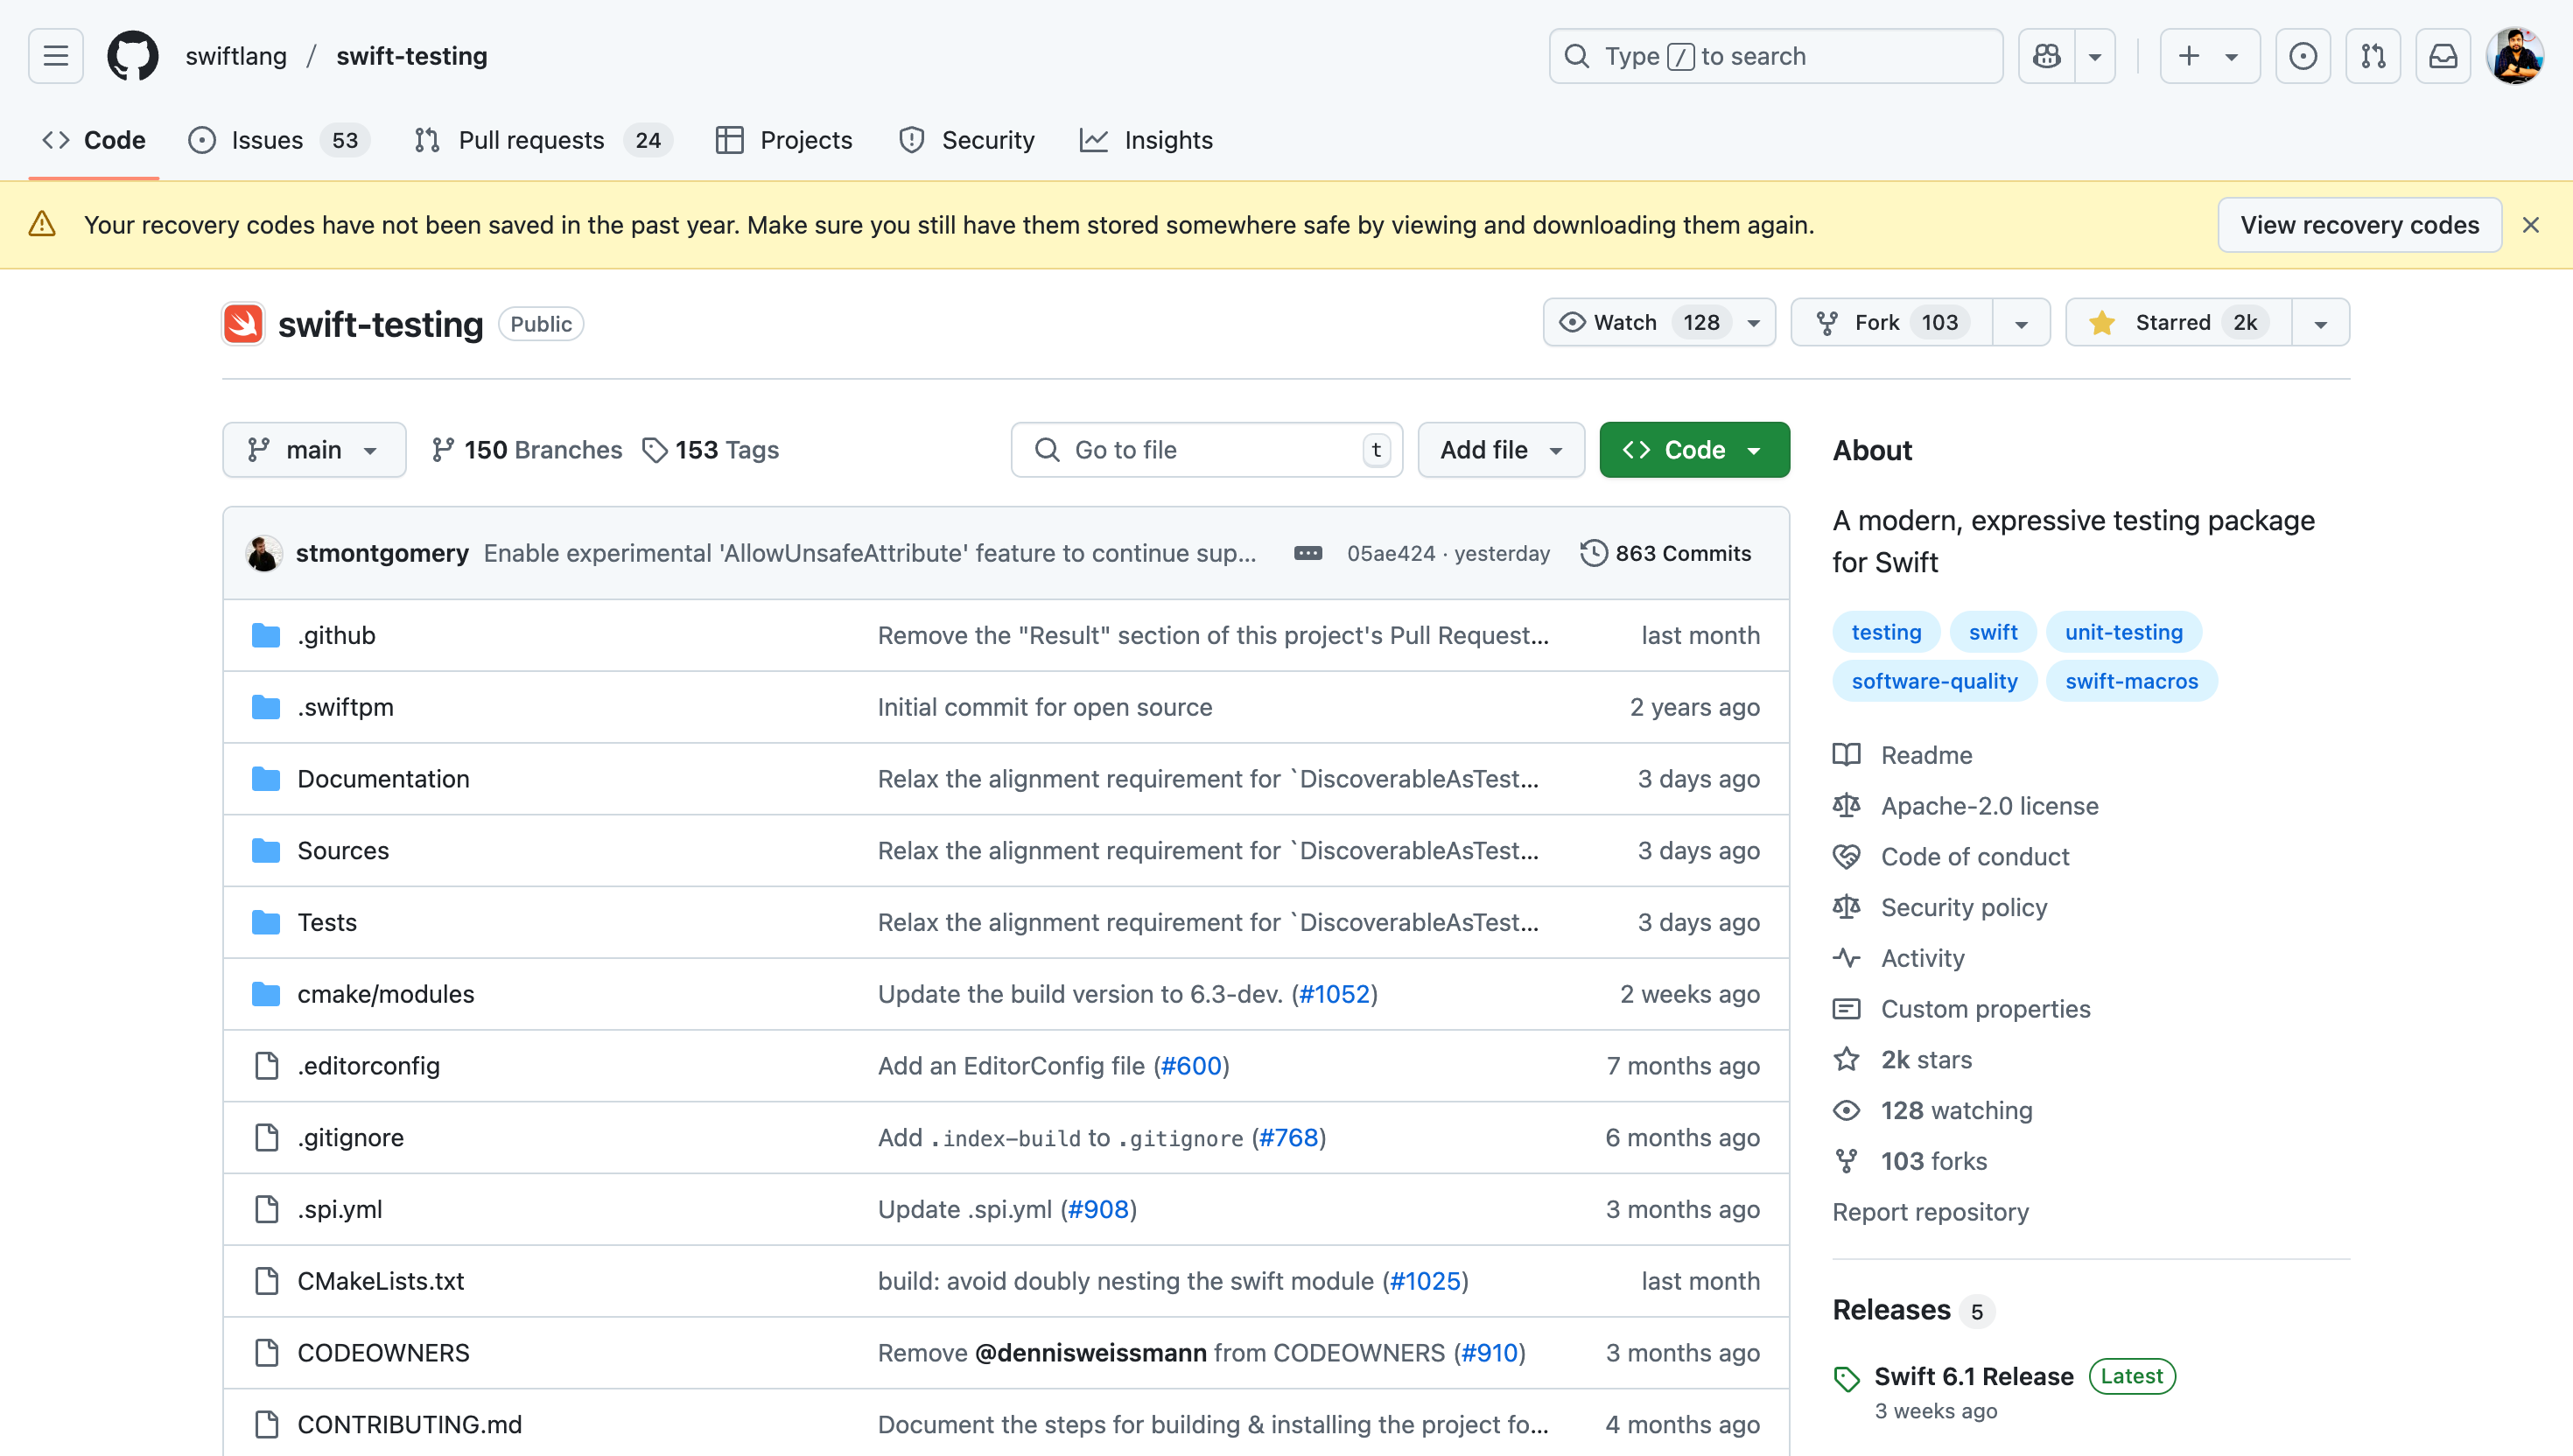
Official GitHub Repo
Integrated Tools and IDE
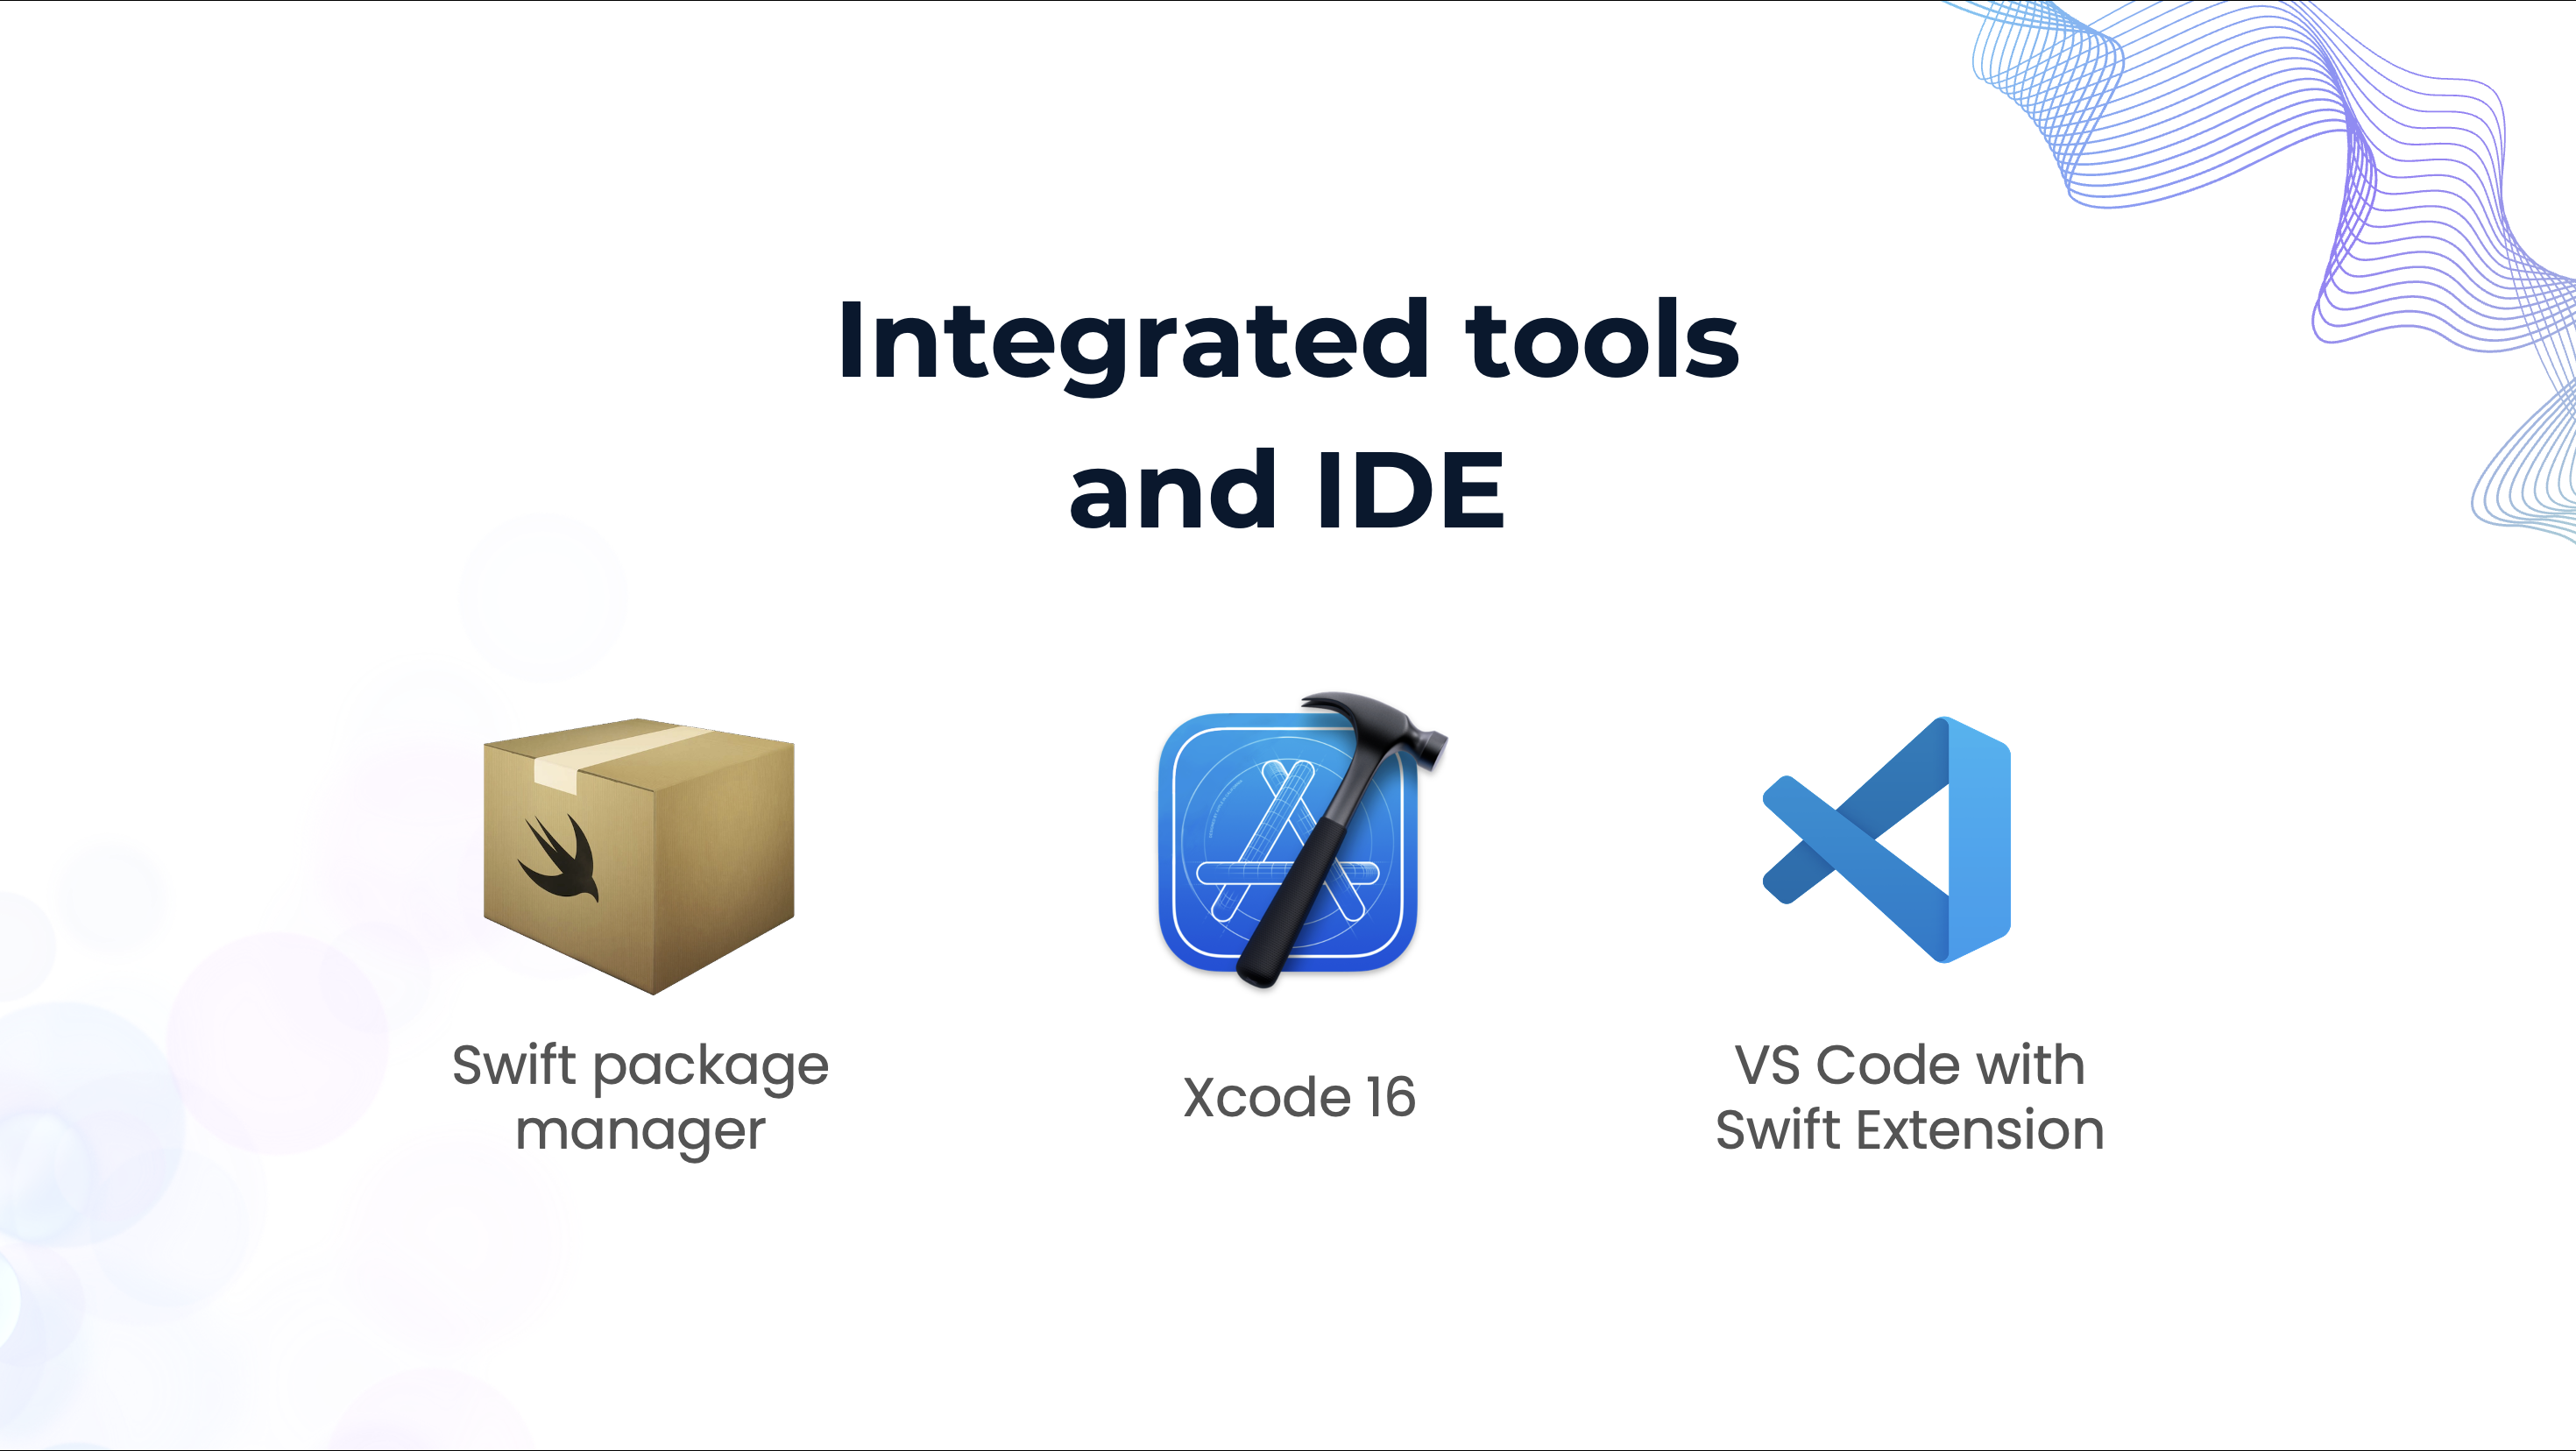
Tools and IDE
When to use what?
XCTest Framework
Performing UI or performance tests
Large existing XCTest suites
Mature XCTest tooling is required
Maintaining older Swift projects
Swift Testing Framework
New projects or adding new tests
Leveraging improved syntax, adopting modern concurrency
Utilizing parameterization
Writing readable, maintainable, robust tests
Important Note
Not a full XCTest replacement
Test method names don't need the test prefix
Tests run randomly and in parallel by default
Don't mix XCAssertions ( ) and #expect ( )
Final Notes
Swift Testing modernizes your testing workflow:
Cleaner syntax
Better concurrency support
Parallel testing by default
Improved error messages
As Swift continues to evolve, adopting Swift Testing will future-proof your testing strategy.
Summary
If you’re short on time, here’s the quick takeaway:
Swift Testing is a modern, Swift-native framework for writing tests introduced in Xcode 16.
Replaces parts of XCTest with cleaner syntax, better concurrency, and default parallel execution.
@Test for defining test cases
#expect and #require macros for readable assertions
Traits to customize test behavior
Suites for grouping related tests
Swift Testing supports running tests in parallel across devices, including visionOS, iOS, and Apple Watch.
Designed for maintainable, scalable, and self-documenting test codebases.
Recommended for any Swift project moving forward!
Note
Please find the GitHub Repo
To learn more about the interesting sections in Swift Testing
Swift Testing Framework Basics - Overview of Swift Testing Framework
Migration Guide from XCTest to Swift Testing Framework - Modernizing Your Tests: A Practical Guide to Swift Testing Framework
Thanks for reading 🚀
If you have questions/suggestion, please add a comment below 👁️🗨️
If you liked this article, please share it with your friends and fellow Developers 🙏


This is a free third party commenting service we are using for you, which needs you to sign in to post a comment, but the good bit is you can stay anonymous while commenting.